Generating Certificates
The Signing Certificates feature in Appflow securely stores your credentials so you can easily reference them when building your app in the cloud.
Overview
The type of signing credentials will vary based on platform (iOS and Android) as well as the type of build, such as for production or development. These credentials are not generated in Appflow. Use the following instructions to generate the correct files to upload to the Appflow dashboard for native builds.
Android Certificates
Signing your app for release to Google Play Store involves two keys:
- Upload key used during the build process to generate a signed bundle
- App signing key used by the Google Play Store before deploying your app
Appflow uses the upload key to generate signed app bundles for release during the cloud build process. The upload key is stored in an Android keystore, which is a .keystore or .jks file.
If you have previously released your app in the Google Play Store, you may already have an upload key on your machine. Do not create a new upload key for Appflow, use the existing key associated with your app.
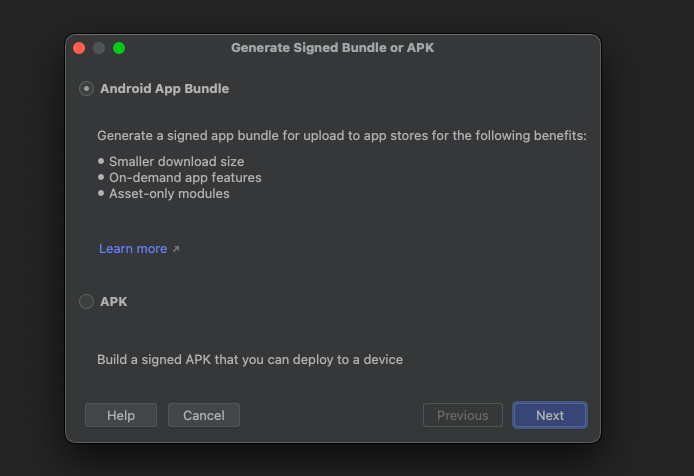
Generating in Android Studio
In Android Studio, navigate to Build > Generated Signed Bundle or APK.
Click 'Next', then on the second screen, click 'Create New' under the keystore path.
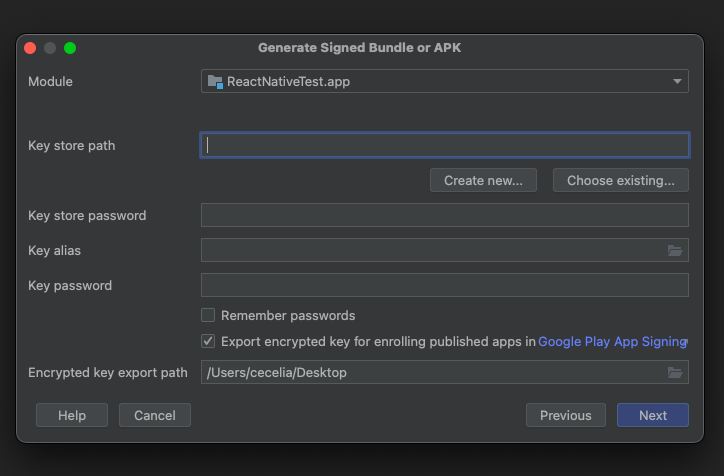
In the popup, select the path to store your keystore file, and set a keystore password, key alias, key password, the key validity time, and your information for the Certificate. Click 'Ok' to generate the new keystore file in the designated path.
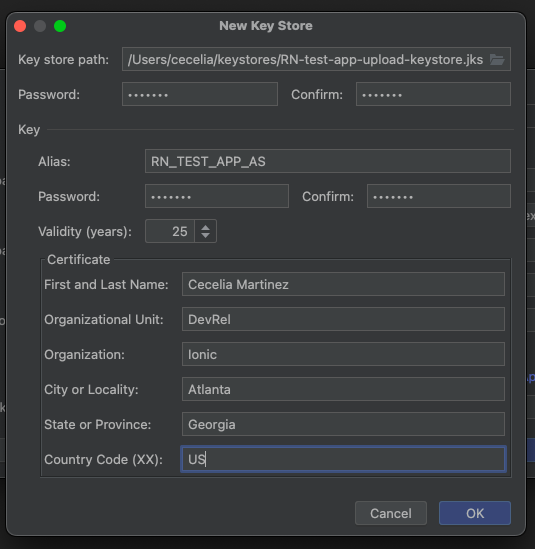
Securely store a backup of your keystore password, key password, alias and keystore file. These are not recoverable and can prevent you ever being able to update an App in the Play Store.
Generating with keytool
Keytool is a command-line tool included in the Java JDK.
To generate a keystore, run the command below, changing MY-RELEASE-KEY and MY_ALIAS_NAME to be relevant to your app. The tool will ask you to enter a keystore password and a key password. Take note of these values, because you will need them when adding your credentials to Appflow.
$ keytool -genkey -v -keystore MY-RELEASE-KEY.keystore -alias MY_ALIAS_NAME -keyalg RSA -keysize 2048 -validity 10000 -storetype jks
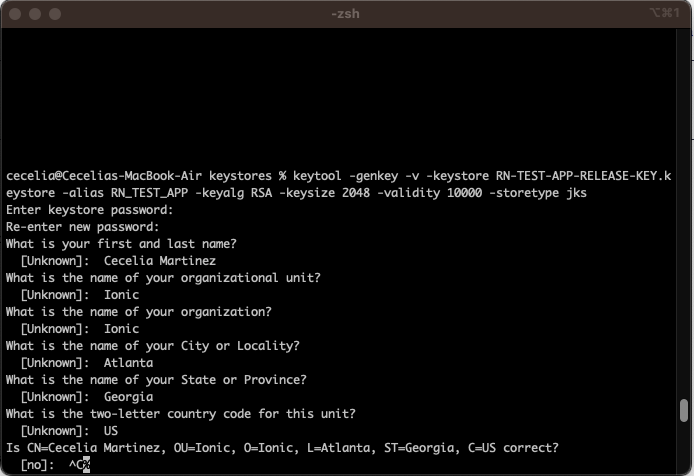
Securely store a backup of your keystore password, key password, alias and keystore file. These are not recoverable and can prevent you ever being able to update an App in the Play Store.
iOS Certificates
iOS builds in Appflow require two credentials:
- Signing Certificate
- Provisioning Profile
You'll need an Apple Developer account (Individual or Organization). See comparing memberships.
You'll also need to register your App ID, register any devices, and optionally connect your Apple Developer account in Xcode.
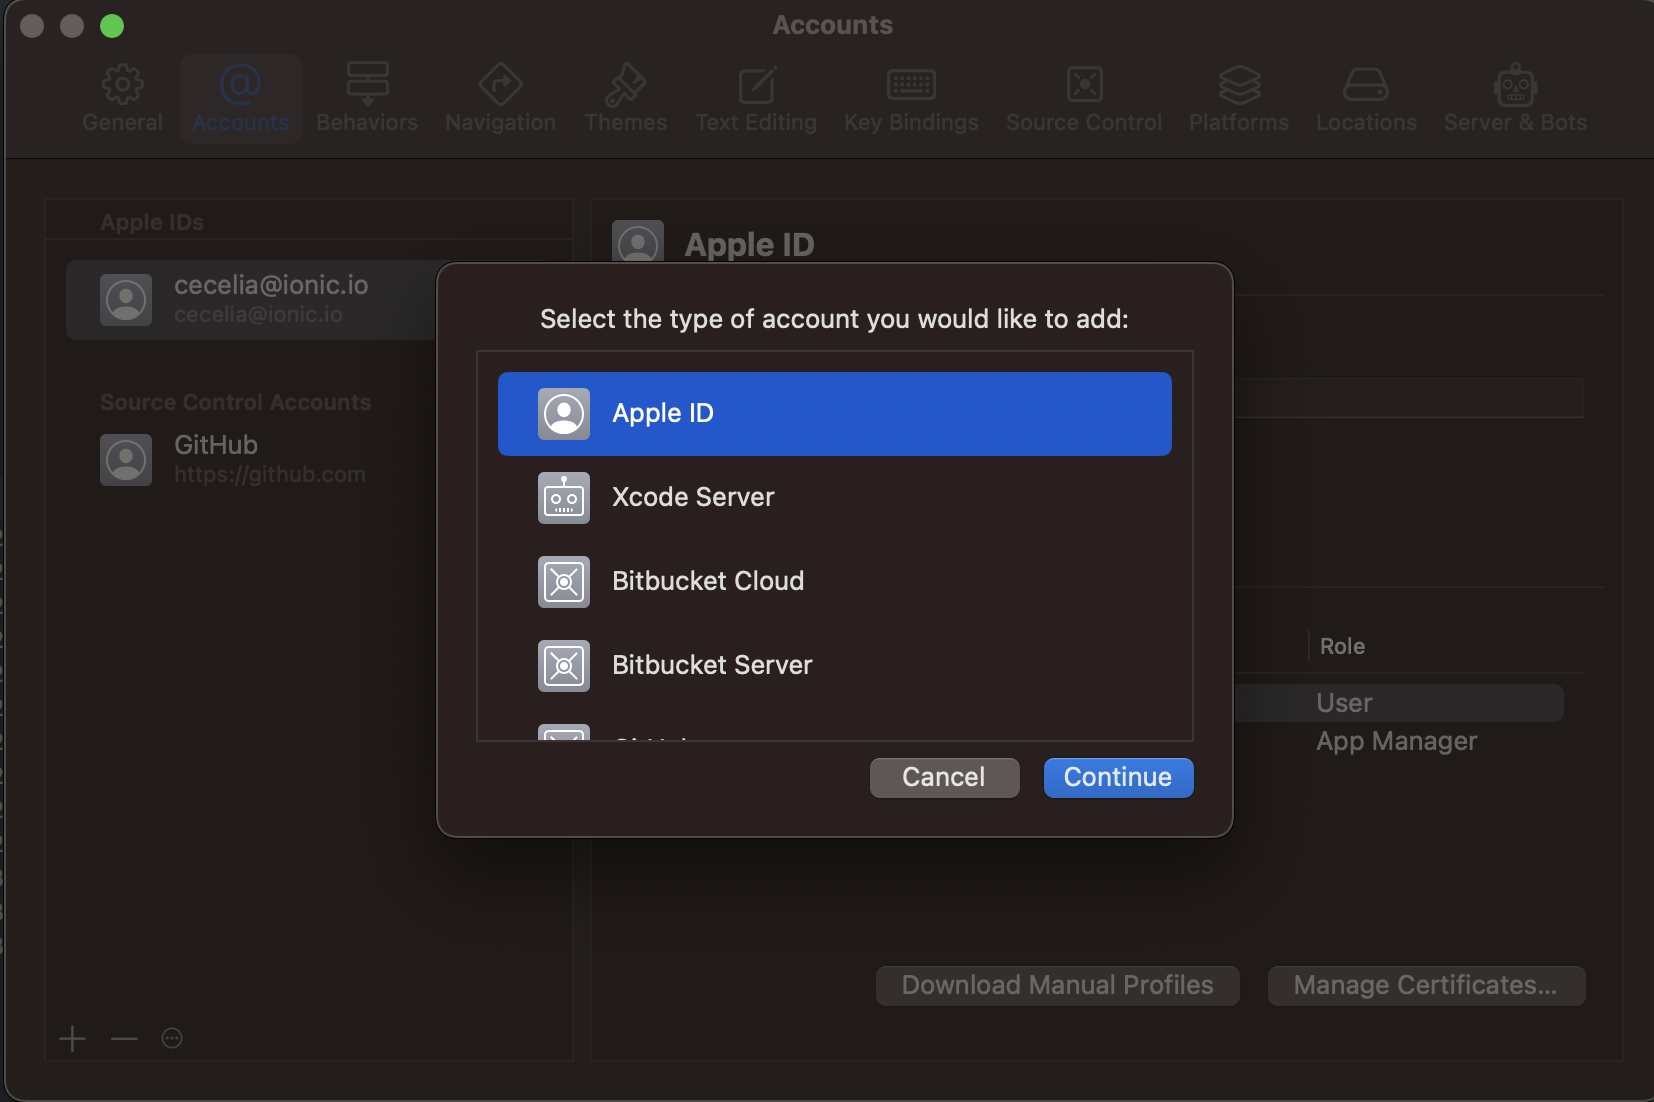
Connecting Apple Developer Account to Xcode (optional)
To register devices and generate signing certificates in Xcode, you first need to connect your Apple Developer account.
In Xcode, select Xcode > Settings and then the Accounts tab. Click the + icon in the left sidebar to add your Apple ID account.
Once connected, you can select the team associated with the Apple Developer account for your Apple ID.
Registering your App ID
Every app must register an ID with Apple.
- Navigate to Certificates, IDs & Profiles › Identifiers in the Apple Developer Center and register a new App ID.
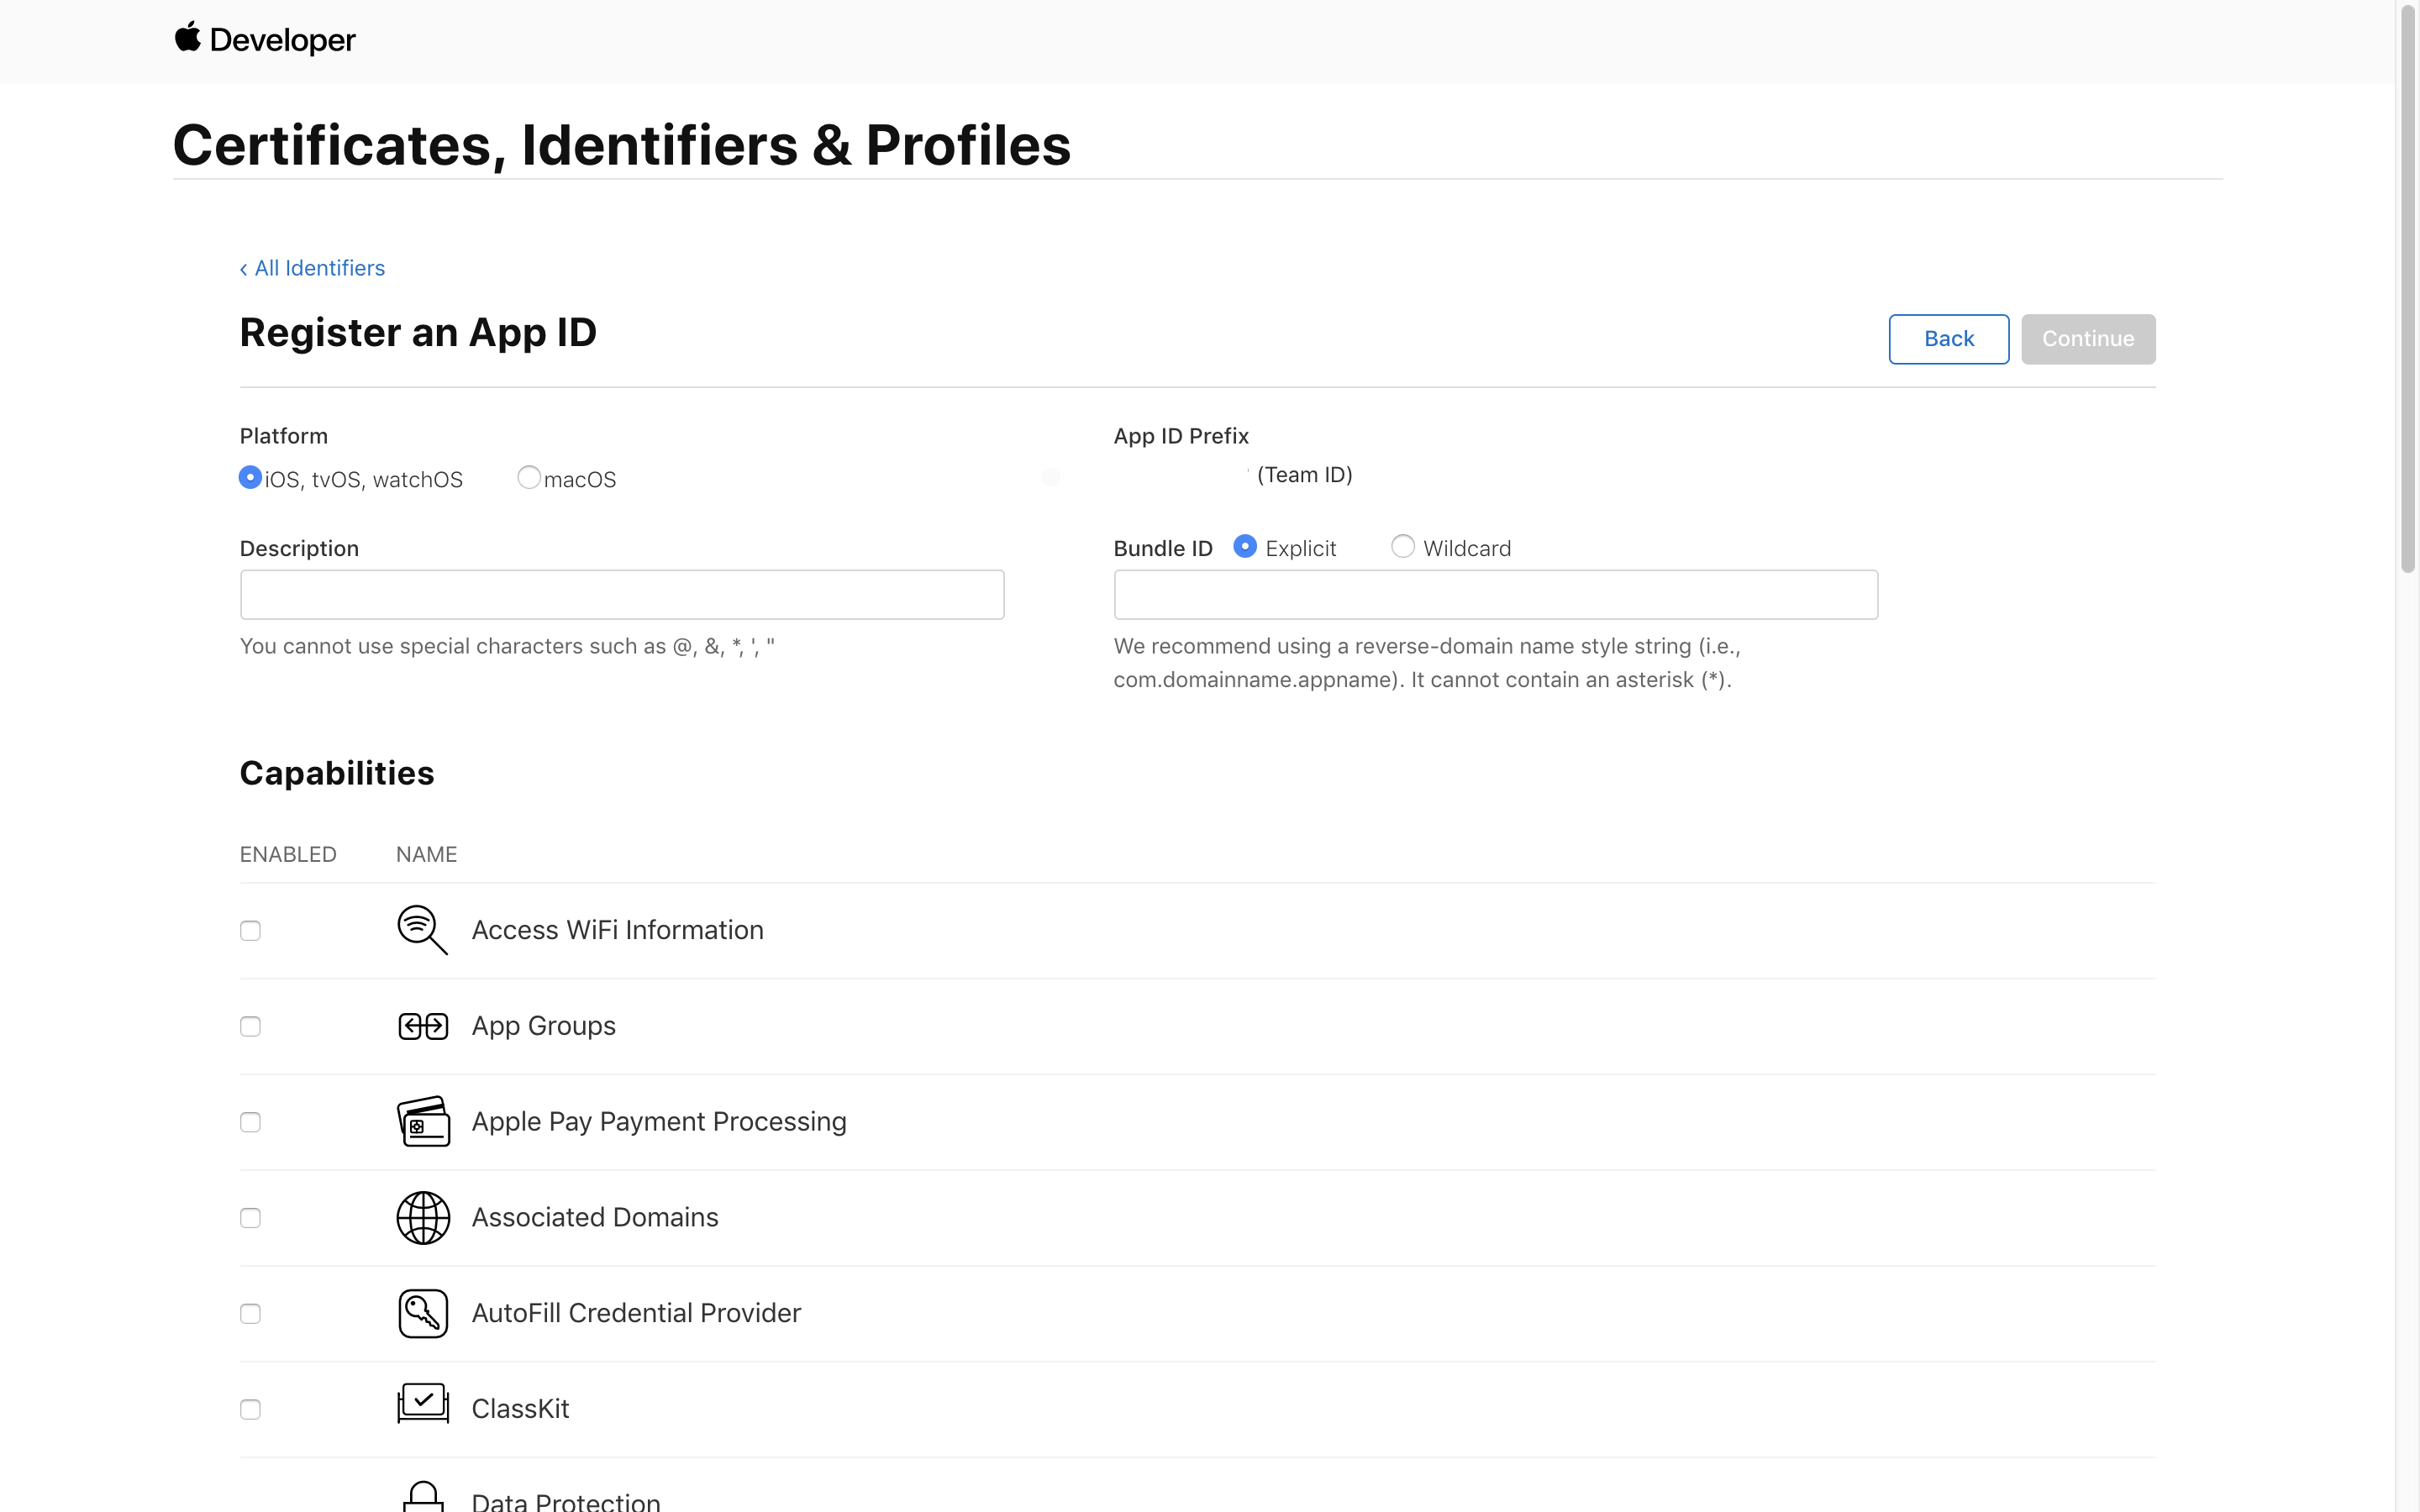
- Under Explicit App ID, set the Bundle ID to the ID you've specified in your app's
config.xmlfile. iOS Bundle IDs are represented as a reversed address, such ascom.ionicframework.MyIonicApp.
Device Registration
Devices must be explicitly registered with Apple for Development and Ad Hoc builds.
If your Apple Developer account is connected to Xcode, you can register devices in Xcode by connecting them to your machine with Xcode running and clicking the "Register" option in the popup dialog. You may need to select "Trust" on your device.
To register a device in Apple Developer Center:
- Navigate to Certificates, IDs & Profiles › Devices and click the + icon to register a new Device.
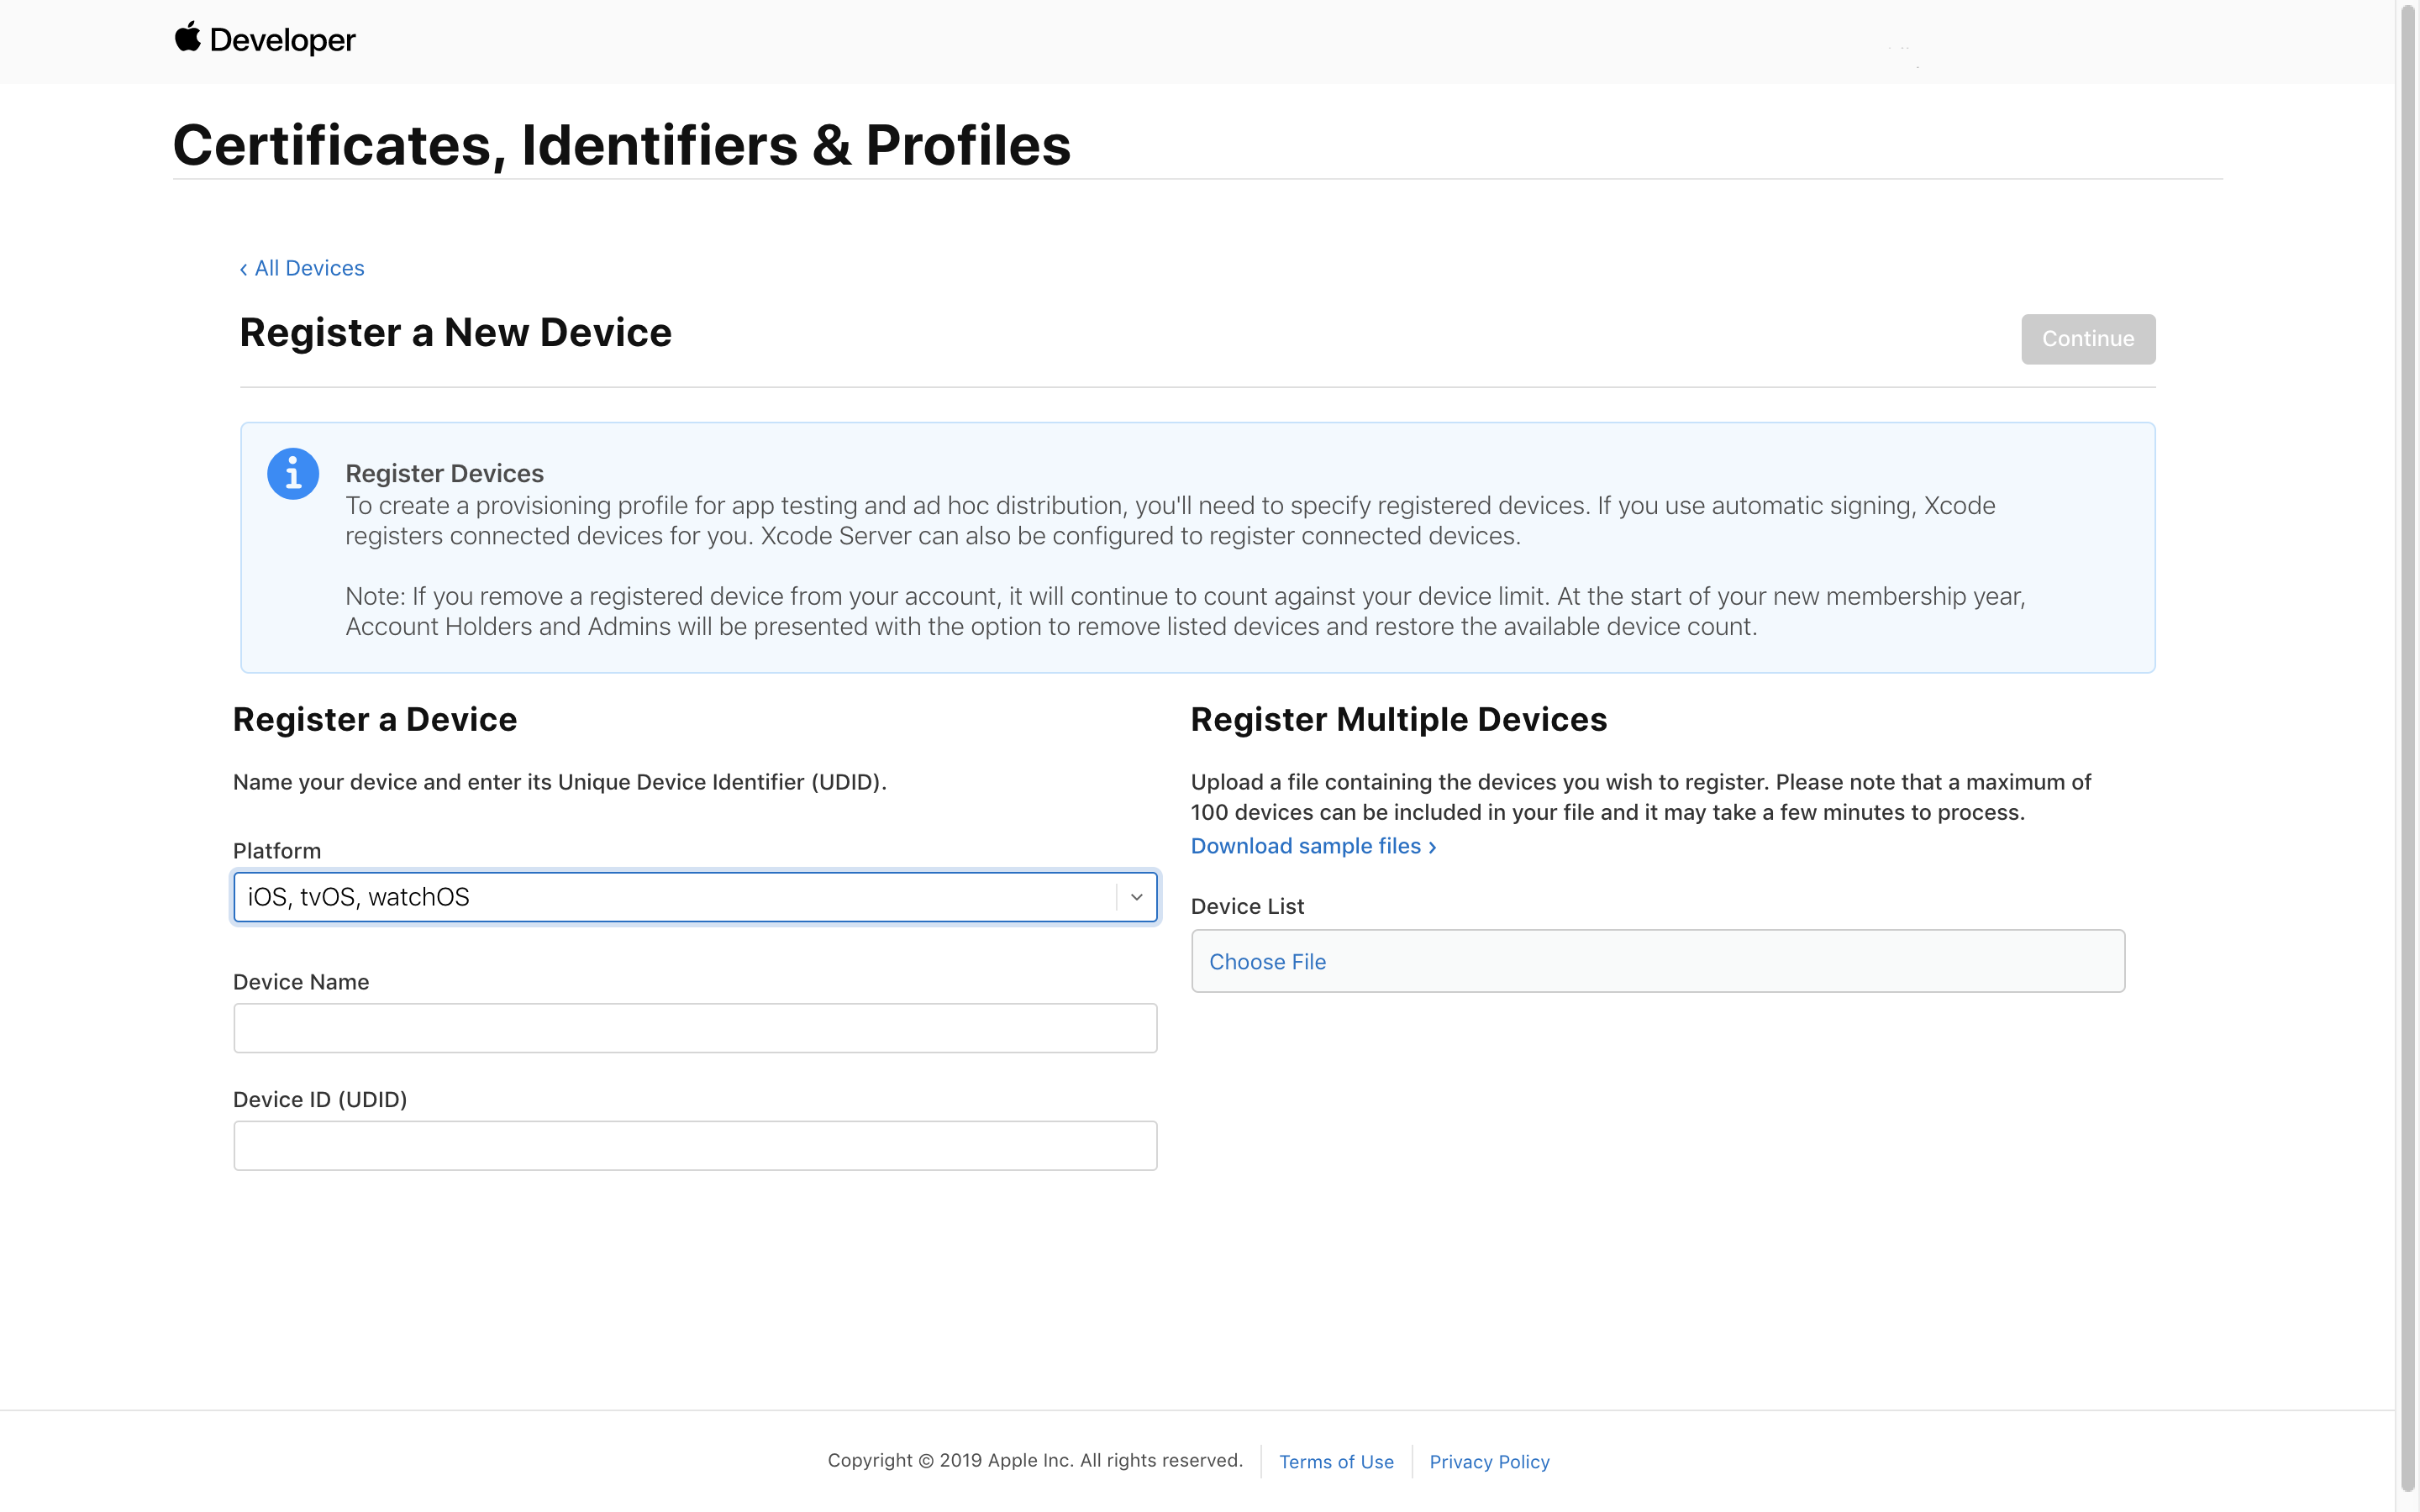
- Give your device a name and enter the device's UDID. Find your UDID.
Signing Certificate
There are two types of Apple signing certificates: Development and Distribution. Development certificates are used for Development build types, while Distribution are required for Ad Hoc, App Store, and Enterprise build types.
Generating Signing Certificate in Xcode (recommended)
Generating a signing certificate in Xcode is recommended because it exports a .p12 file without the need to generate a signing certificate request file or convert a .cer.
In Xcode, navigate to Xcode > Settings and then the Accounts tab. Select the team associated with your Apple Developer account and click "Manage Certificates".
In the popup, click the + icon and select the certificate type, either Development or Distribution.
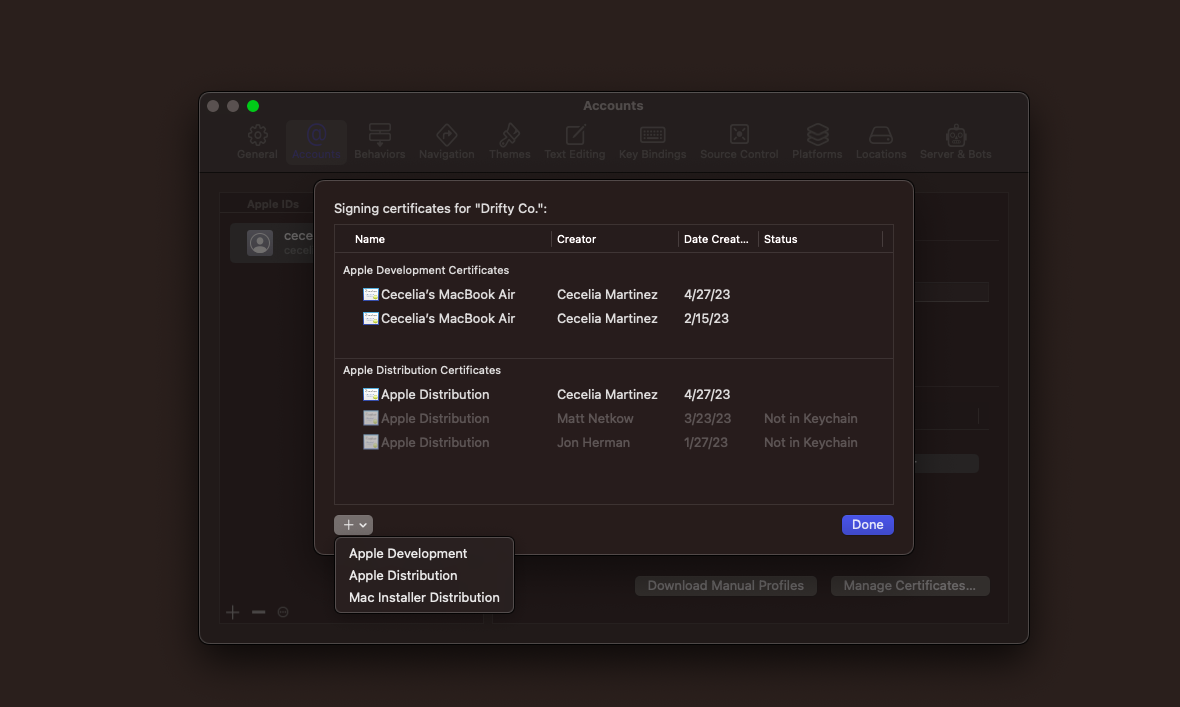
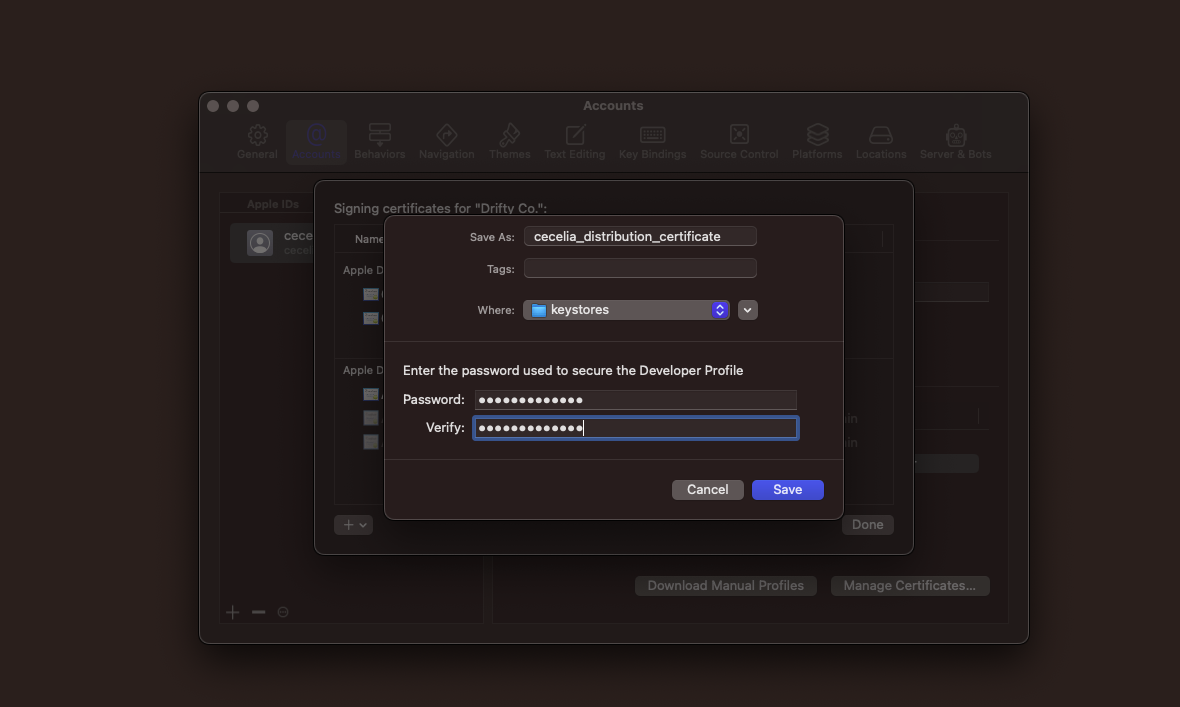
Once the certificate has been generated, right click and selec "Export Certificate".
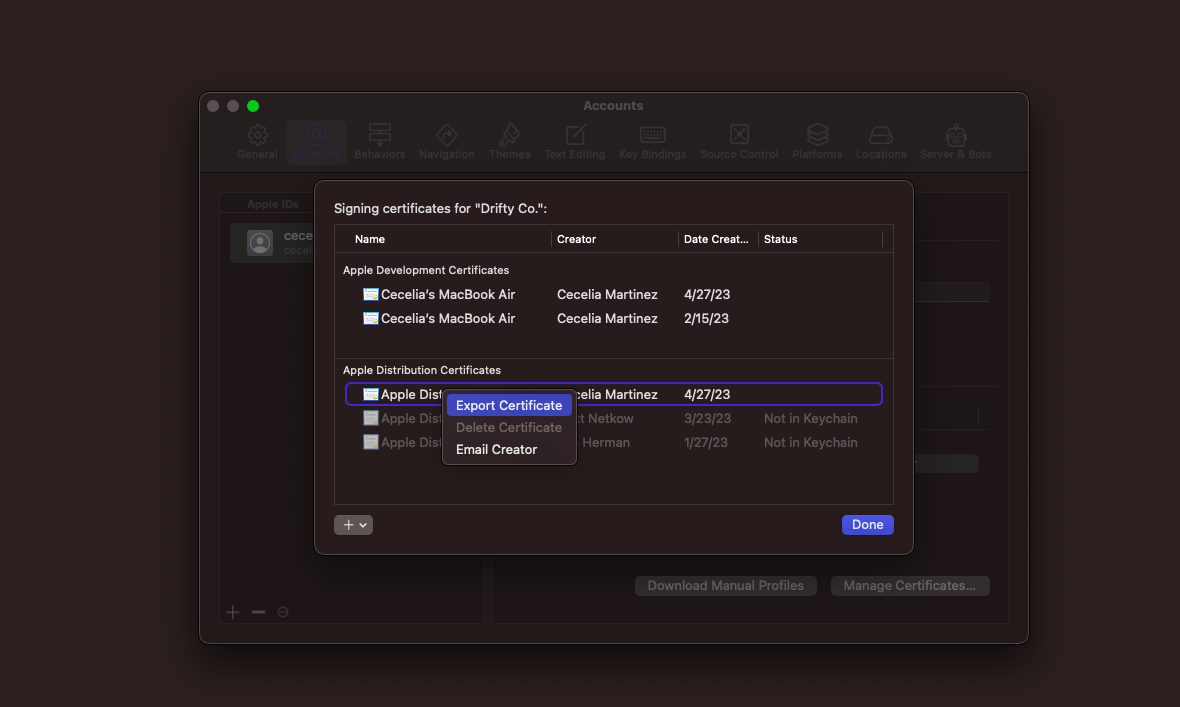
Then, save the certificate, giving it a strong password. Make note of the password, as you will need it when uploading the certificate in the Appflow.
Generating Certificate in Apple Developer Center
You can also generate a signing certificate in the Apple Developer Center. This is a multi-step process that involves:
- Generating a
.certSigningRequestfile - Creating a
.cercertificate file - Converting the
.cerfile into a.p12file
Generating Signing Certificate Request File
Before you can get a certificate from the Apple Developer Center, you'll need to generate a certificate signing request file. It can be created on Mac OSX by using Keychain Access and on other platforms by using OpenSSL.
To generate using Keychain Access:
- Navigate to Keychain Access › Certificate Assistant › Request a Certificate From a Certificate Authority on your Mac.
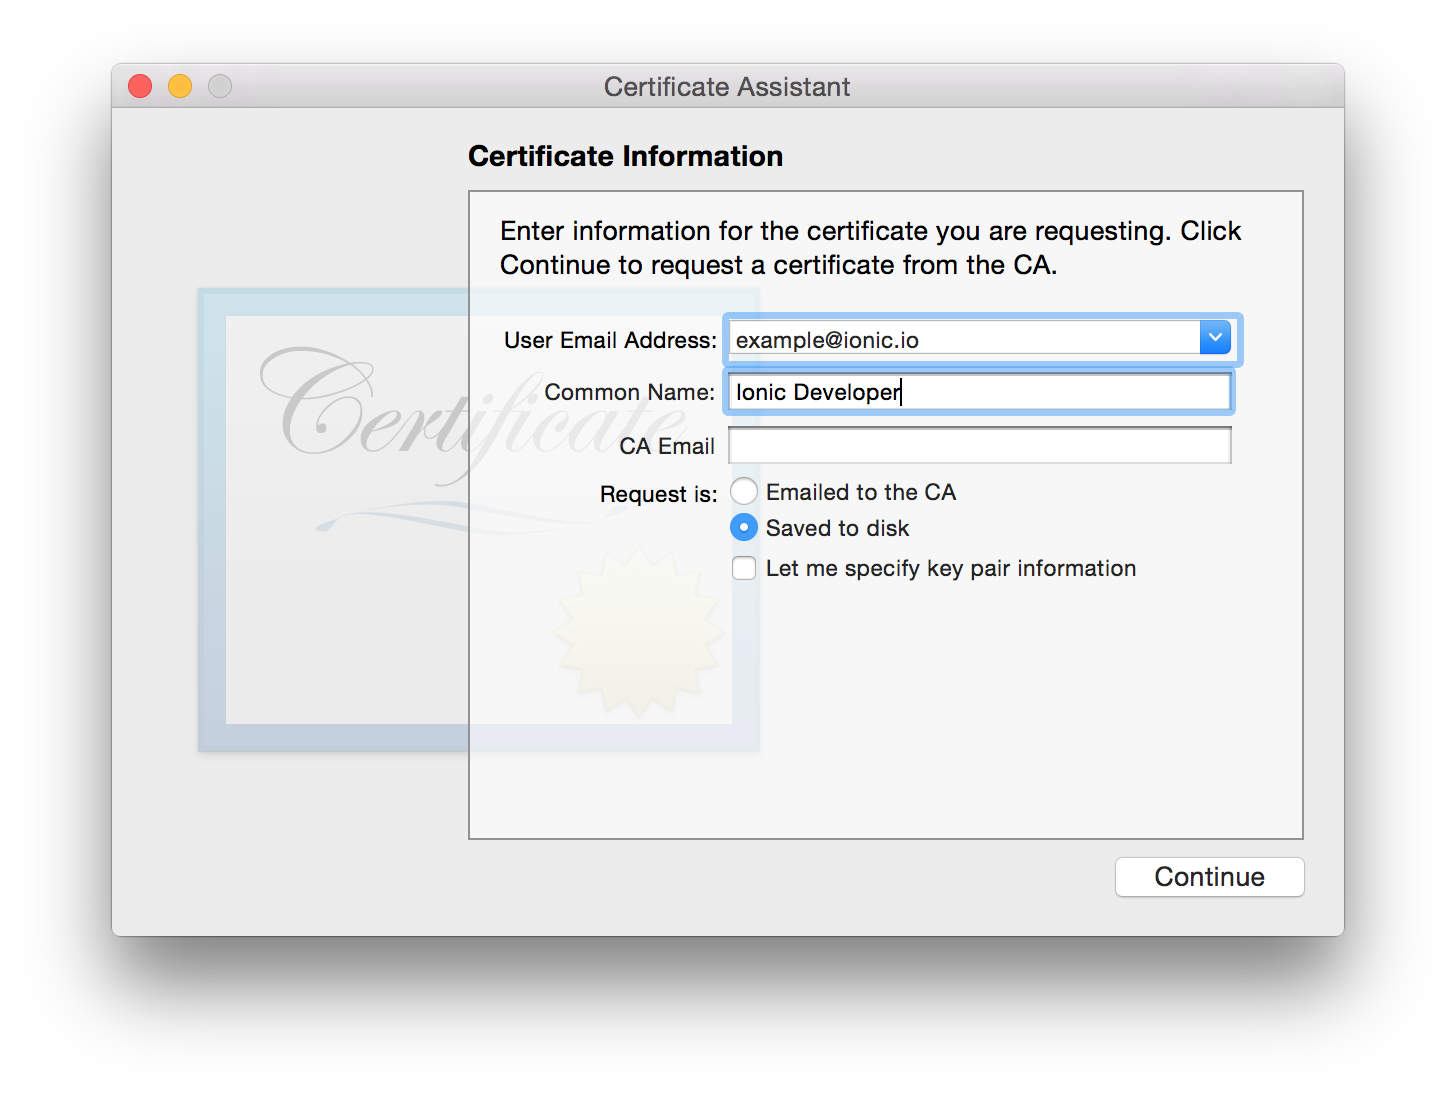
- Enter your name and email address. Leave the CA Email blank.
- Select Saved to disk and hit continue. This will generate your
.certSigningRequestfile.
To generate using OpenSSL:
- Generate a private RSA key file.
$ openssl genrsa -out keyname.key 2048
- Create the certificate signing request file by filling out the interactive form.
$ openssl req -new -key keyname.key -out CertificateSigningRequest.certSigningRequest
Creating .cer file in Apple Developer Center
- Navigate to Certificates, IDs & Profiles › Certificates in the Apple Developer Center and create a new certificate. Select the certificate type, either iOS App Development or iOS Distribution.
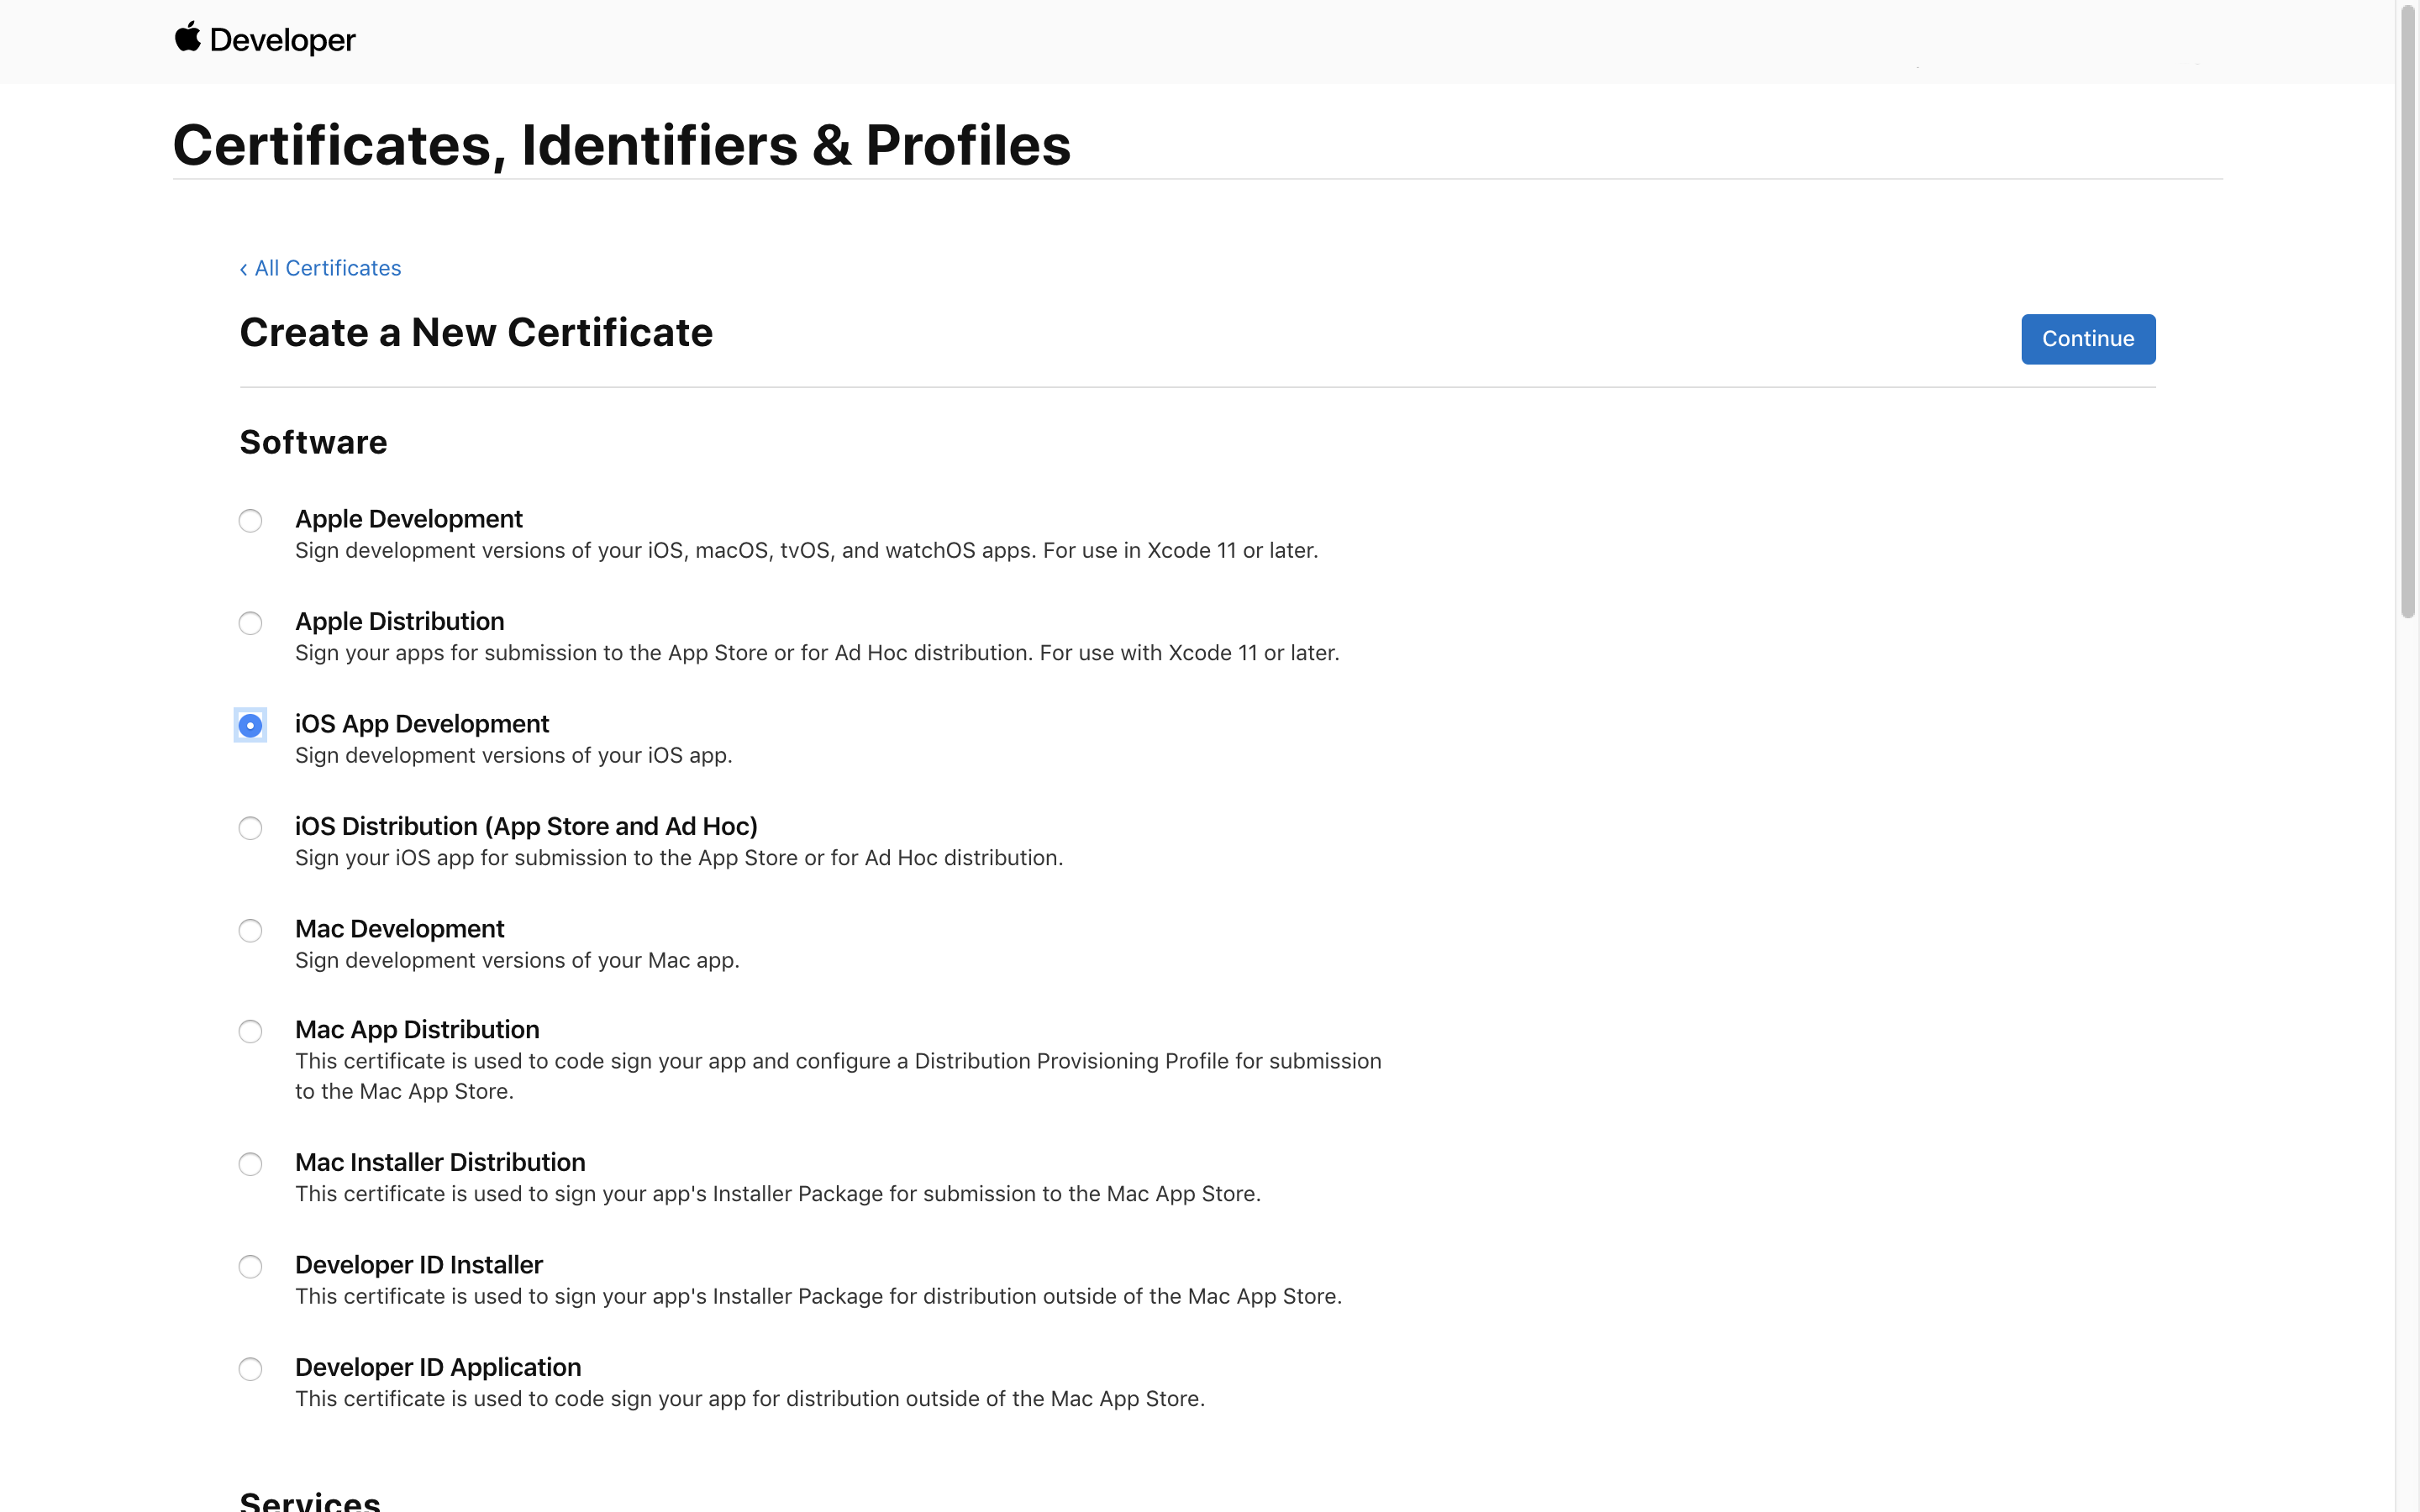
- Click 'Continue' and upload the
.certSigningRequestyou created. Then, download your certificate. It should be a.cerfile.
Converting certificate file to .p12
Next, we'll need to convert the certificate from a .cer file to a .p12 file. It can be converted on Mac OSX by using Keychain Access and on other platforms by using OpenSSL.
Using Keychain Access:
- Drag your
.cerfile into your login keychain. - Click the My Certificates tab.
- Right-click the certificate and choose Export.
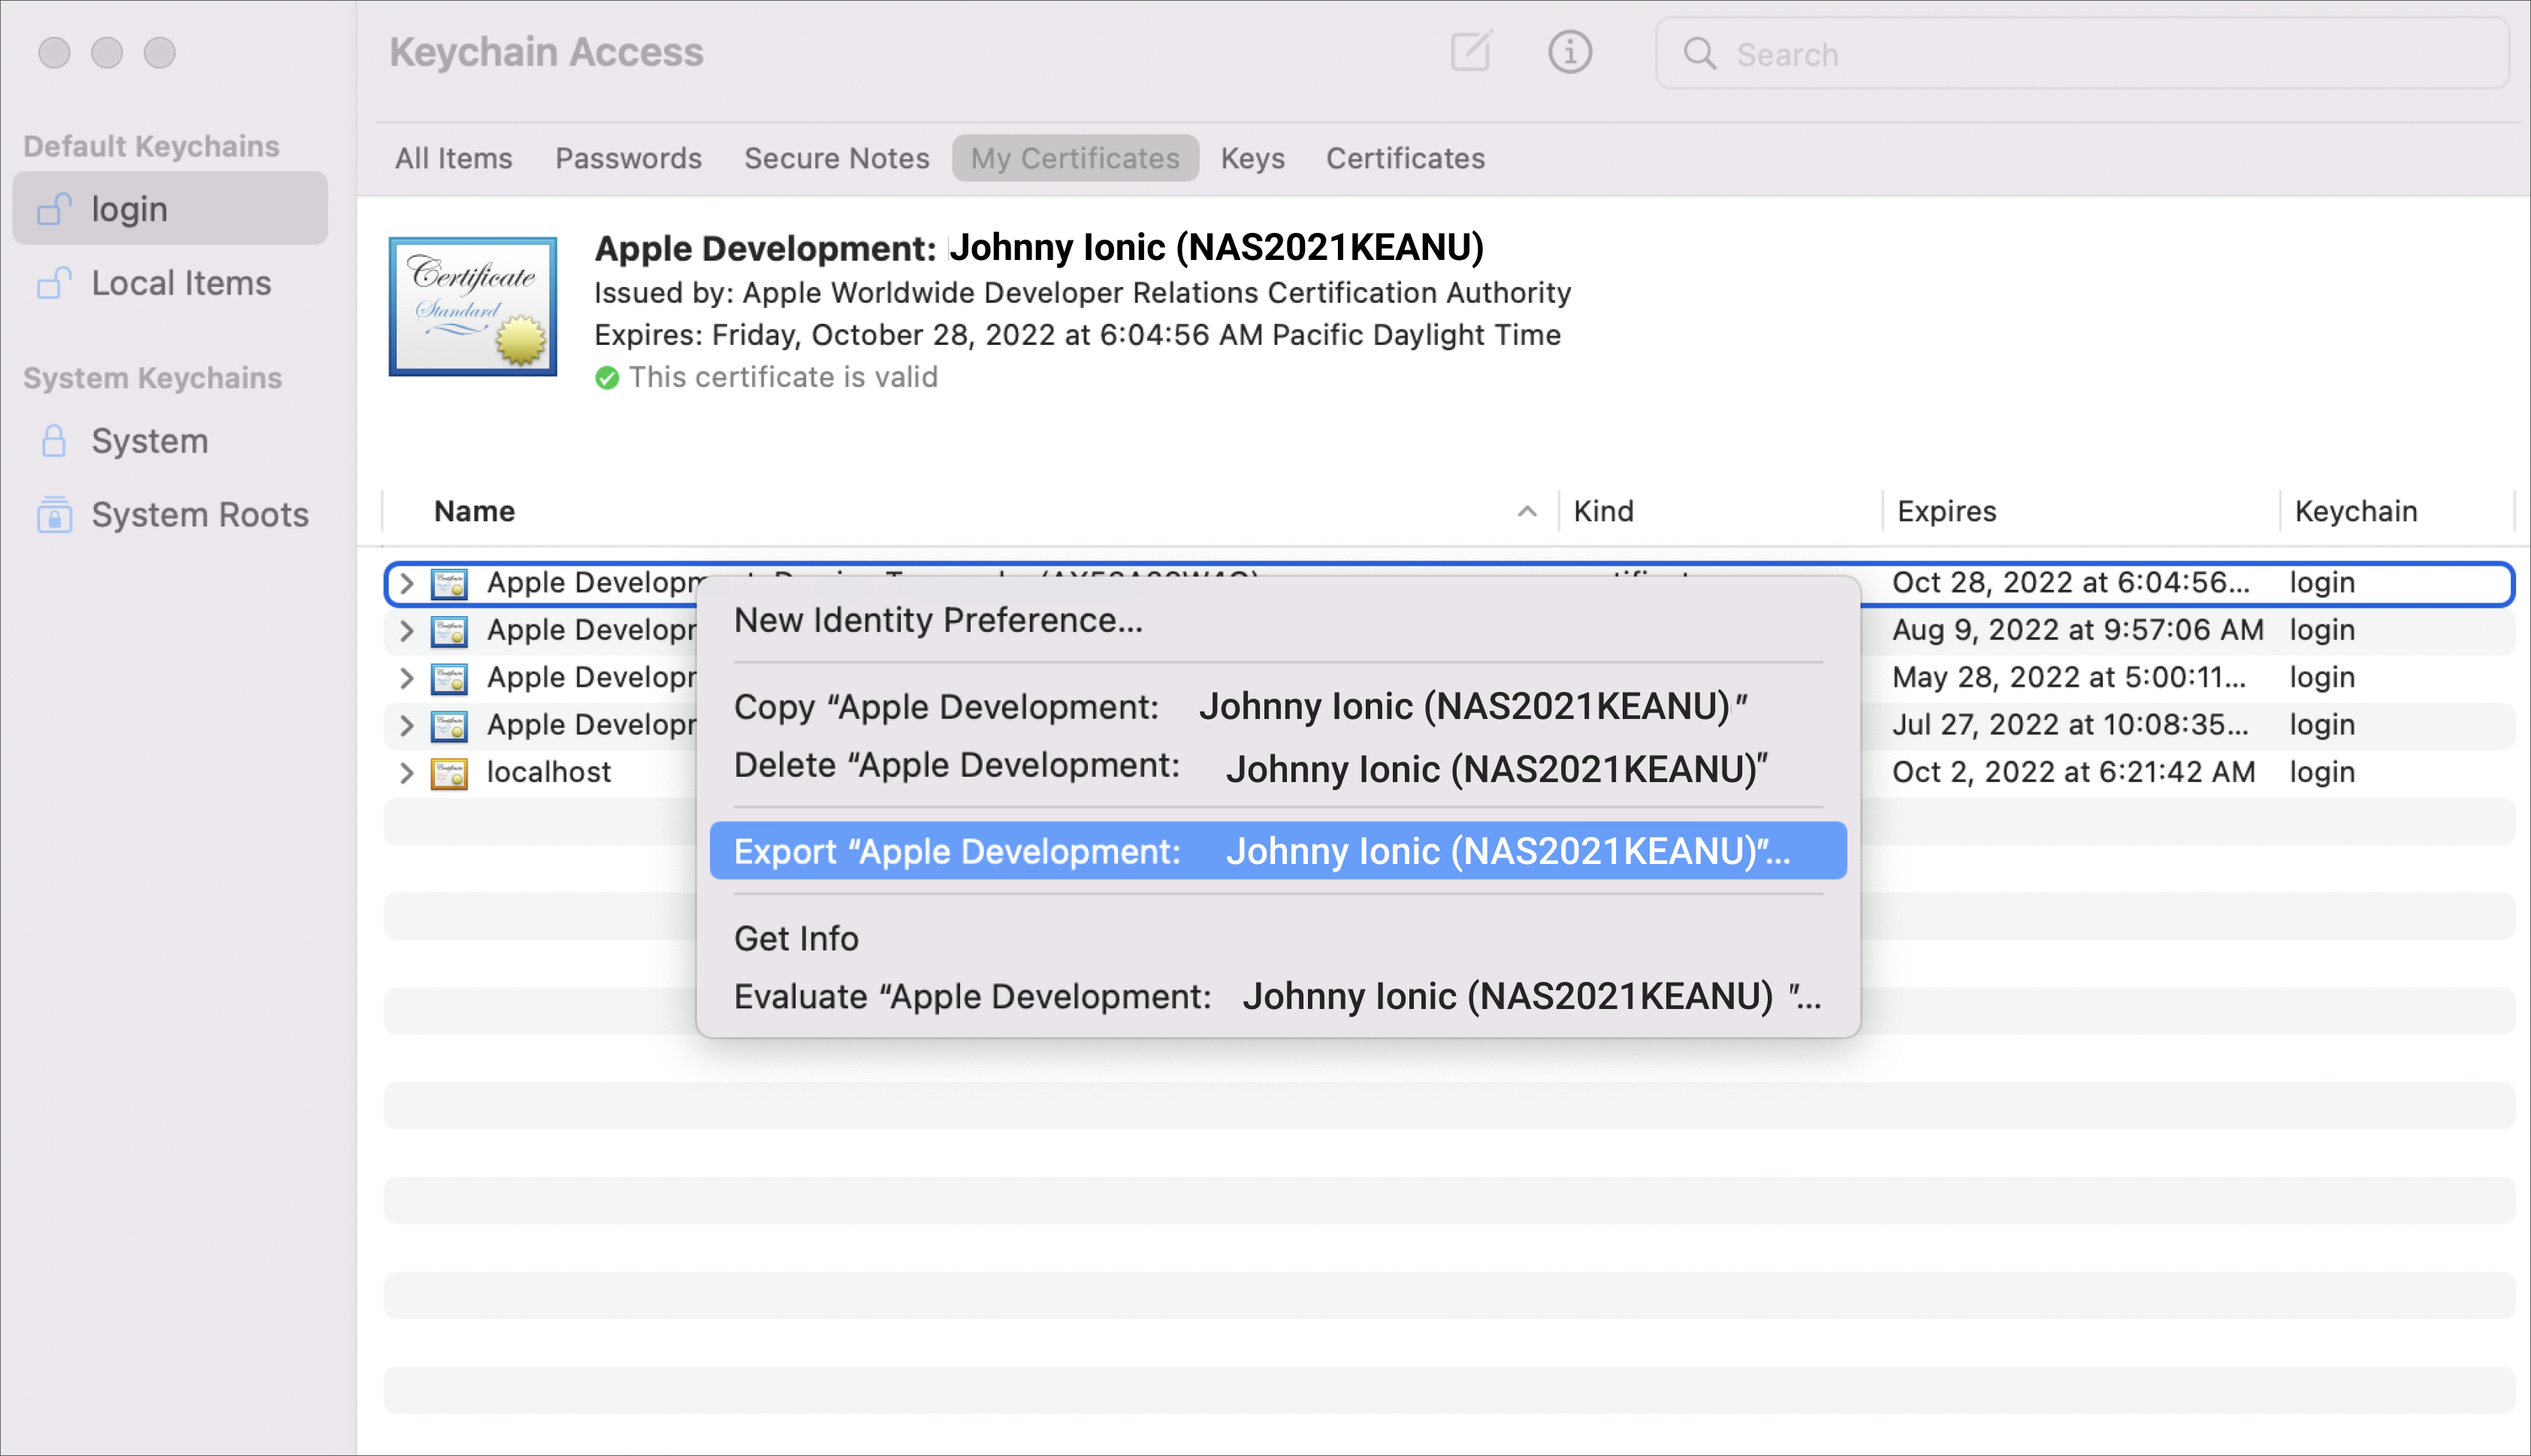
- Select Personal Information Exchange (.p12) for File Format.
- Save the certificate, giving it a strong password.
Using OpenSSL:
- Download your iOS certificate to the same directory as your private RSA key.
- Change the format of the iOS certificate to PEM.
$ openssl x509 -inform DER -outform PEM -in ios_development.cer -out ios_development.cer.pem
- Export the certificate as a
.p12file, giving it a strong password.
$ openssl pkcs12 -export -inkey keyname.key -in ios_development.cer.pem -out Certificates.p12
Provisioning Profile
Provisioning profiles give your app access to be installed, or provisioned, on specific devices. For iOS App Development or Ad Hoc Distribution provisioning profiles, devices are selected manually.
- Navigate to Certificates, IDs & Profiles › Profiles in the Apple Developer Center and create a new provisioning profile.
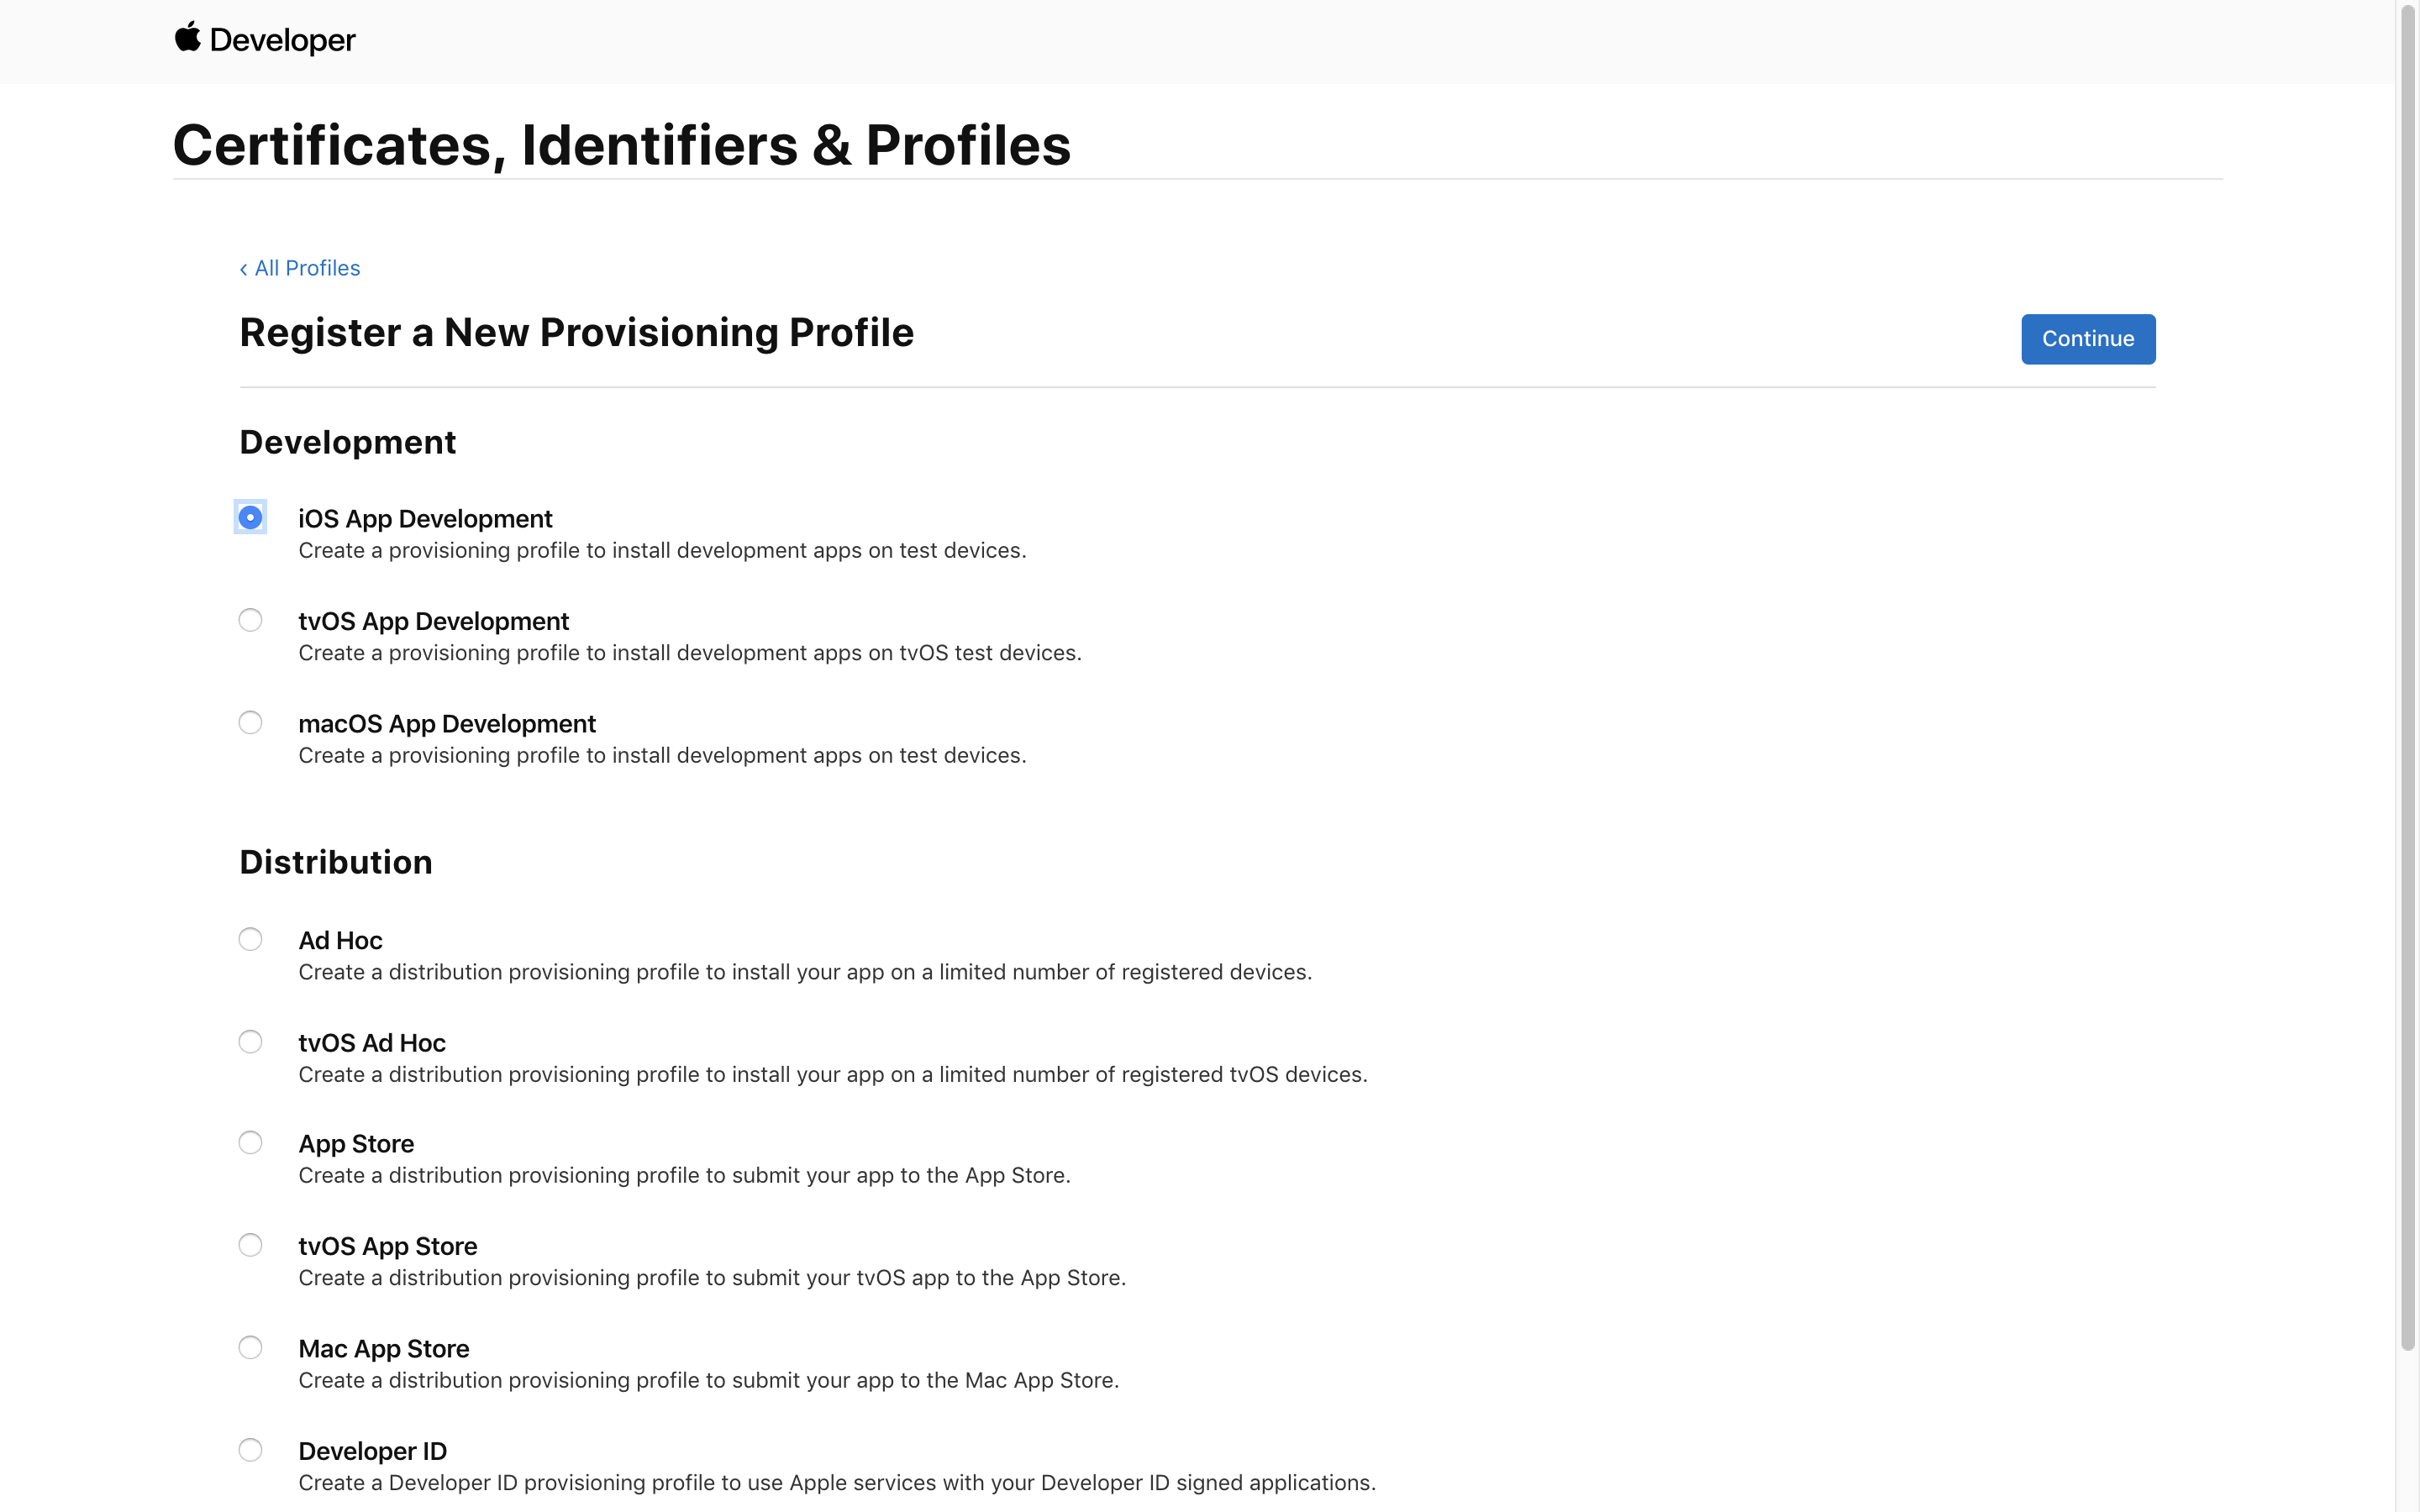
- Select the profile type based on your build type: iOS App Development, Ad Hoc, or App Store
- Select the correct App ID (with the Bundle ID matching your app's
config.xmlfile) - Select the certificate you generated
- Select any and all devices if generating a development or ad hoc profile
- Download the
.mobileprovisionfile, which is your provisioning profile file