Announcing Ionic React

Today we’re thrilled to announce the general availability of Ionic React, a native React version of Ionic Framework that makes it easy to build apps for iOS, Android, Desktop, and the web as a Progressive Web App. All with one code base, standard React development patterns, and using the standard react-dom library and huge ecosystem around the web platform.
Ionic React represents the most significant change in Ionic Framework’s history and opens up Ionic Framework to a whole new audience. Given that, we’d like to tell a bit of the story about how we got here, why we built it, and who it’s for (jump to the end if you just want to see some code, I won’t be offended 😅).
Why React?
For those that have been following Ionic since the early days, it might be a surprise to hear that we now support more than just Angular, and React of all things!
When we started Ionic Framework, the mission was to empower web developers to build top-quality apps using their existing web development skills, focused on the massive ecosystem around the web platform and web technology.
We envisioned being able to build rich JavaScript-powered controls and distribute them as simple HTML tags any web developer could assemble into an awesome app. Turns out we were a few years too early on that being possible directly in the browser, so, instead, we jumped on the emerging category of frontend frameworks and went all-in on AngularJS and their awesome directive system. Ever since then, we’ve been known primarily as an Angular-focused app framework.
Fast forward to 2019, and the frontend ecosystem looks nothing like it did back in 2013. Developers have access to tons of awesome frontend framework options, and few are as popular and successful as React.
We revisited our original vision and realized that building a version of Ionic Framework for React made perfect sense. Combined with the fact that we had several React fans join the Ionic team over the years (and many super-fan converts, including yours truly!), there was strong desire internally to see Ionic Framework support React as well.
So we embarked on a quest to build a native React version of Ionic Framework that we felt React developers would love to use.
But what about React Native?
You might be wondering why we’d build Ionic React when React already has a great mobile option with React Native.
We asked ourselves that, too. We sure didn’t want to invest a ton of time building something that would be an apples-to-apples comparison with React Native. We’d rather spend our creative energy on technology that solves problems others aren’t solving.
However, when we took a step back, we realized that Ionic React brought something pretty unique to the React ecosystem, and had a very different vision for what the future of app development might look like.
Instead of building an abstraction on top of iOS and Android native UI controls, we wanted to build something that was DOM-native, that would use the standard react-dom library and all the libraries that supported it out of the box, and the decades of existing work around the browser. When we looked at installs for react-dom compared to react-native, it was clear to us that vastly more React development was happening in the browser and on top of the DOM than on top of the native iOS or Android UI systems (16x more, in fact!). That further confirmed our belief that “web devs wanna web dev” and take advantage of their experience and existing library of functionality they’ve built on the DOM.
On top of that, developers are increasingly interested in Progressive Web Apps, especially in the enterprise. PWAs are, at best, an afterthought in the React Native ecosystem (and actually, not officially supported). In contrast, Ionic Framework is one of the leading PWA solutions and has some of the best performance for PWAs in the entire web ecosystem, thanks in part to our work on our Stencil project which we use to generate highly efficient components under the hood.
We also heard from a number of developers that wanted to use Ionic React in their existing React Native apps, by building more screens in their app out of a native WebView frame (using Capacitor, more on that in a bit) to move more quickly or enable traditional web developers to work in tandem with the existing native and React Native dev teams.
Finally, after talking with a lot of fellow React developers at conferences like React Rally, it was clear that there was a gap in the React ecosystem that Ionic could fill, along with a desire for an easier mobile and Progressive Web App development solution than what was currently available in the ecosystem.
This isn’t your father’s Cordova
If your last experience with a web-focused mobile development platform was with Cordova, we understand if you didn’t have a great experience and might be hesitant to come back.
While Ionic still supports Cordova, new Ionic apps run on an all-new cross-platform engine called Capacitor that we built in-house. Capacitor takes modern JS and browser features, and makes it possible to deploy one app across iOS, Android, Electron, and the web as a Progressive Web App.
In fact, Progressive Web App support was a major goal of Capacitor, and many Capacitor APIs have powerful PWA support, such as Camera which has a custom UI experience available for adding native-quality camera features to your PWA.
While it is inspired by Cordova, in practice the development experience is very different. Capacitor is available as a modern JS API you can import directly into your app, with easy-to-use APIs for everything from File management to Geolocation to app-to-app sharing, to Push and Local Notifications. And exposing new Native SDKs to Capacitor is incredibly easy, requiring just a bit of wrapper code with first-class support for Swift on iOS (Java on Android).
From Ionic developers that have made the switch, we hear that the experience is much preferred, and feels quite a bit different from Cordova.
Capacitor is being used today in some pretty huge apps, including some that you will likely use as a consumer of various global fast food establishments. 😅
We’re confident you’ll love the combination of Ionic React and Capacitor.
More than Open Source
Ionic is bringing something different to the React and cross-platform ecosystem: a fully-supported, enterprise-ready offering with services, advisory, tooling, and supported native functionality available to teams that need more than they can get through community-supported options.
Ionic, the company behind Ionic Framework, works with hundreds of medium to large companies and enterprises, providing advanced support and software that they need as they build mission-critical apps for their business. We’ve got lots more information on this on our website.
Additionally, our Appflow service can be used to perform remote app updates in real-time, or build iOS and Android binaries as part of a CI/CD workflow.
If you want to learn more about the company behind Ionic Framework, check out our 2019 Business Update.
Getting Started
Note: The first official version of Ionic React is v4.11.
Enough with the backstory, how do you actually start building with Ionic React?
Getting started with Ionic React is easy. First, if you haven’t already done so, install the latest Ionic CLI:
npm i -g @ionic/cli
Already have a React app? Adding Ionic React is easy.
Then, create a new project:
ionic start my-react-app
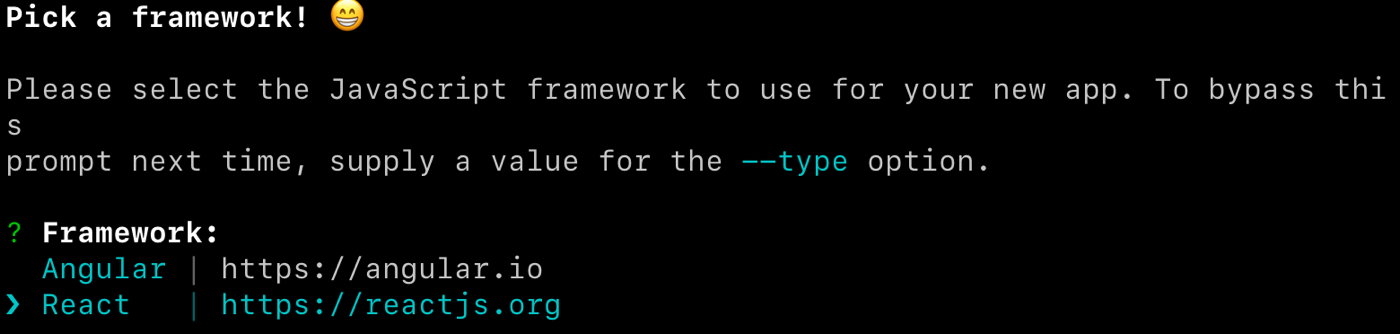
The CLI will guide you through the setup process by first asking a couple of questions. The first of which is what framework you would like to use, select React (of course!).
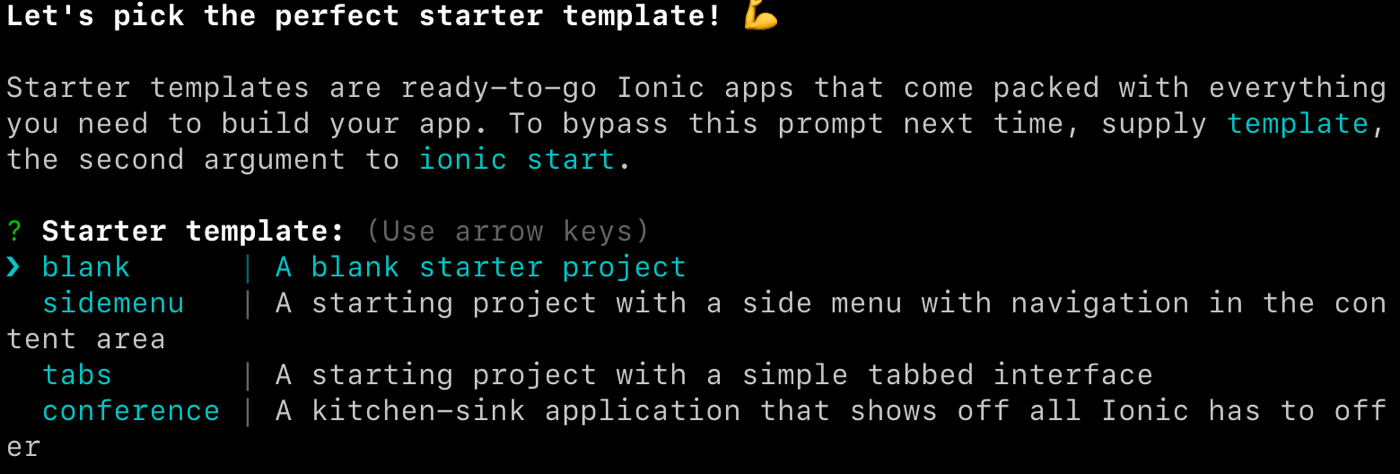
Next, the CLI will ask which starter template you would like to use. We ship a few different starters to help get you up and running quickly. Go ahead and choose tabs for this demo:
The CLI will now create your app and install all the dependencies. Once it is done, go into the directory and launch the app:
ionic serve
Under the covers, the ionic serve command uses the Create React App (CRA) project to compile your app, start a dev server, and open your app in a new browser window.
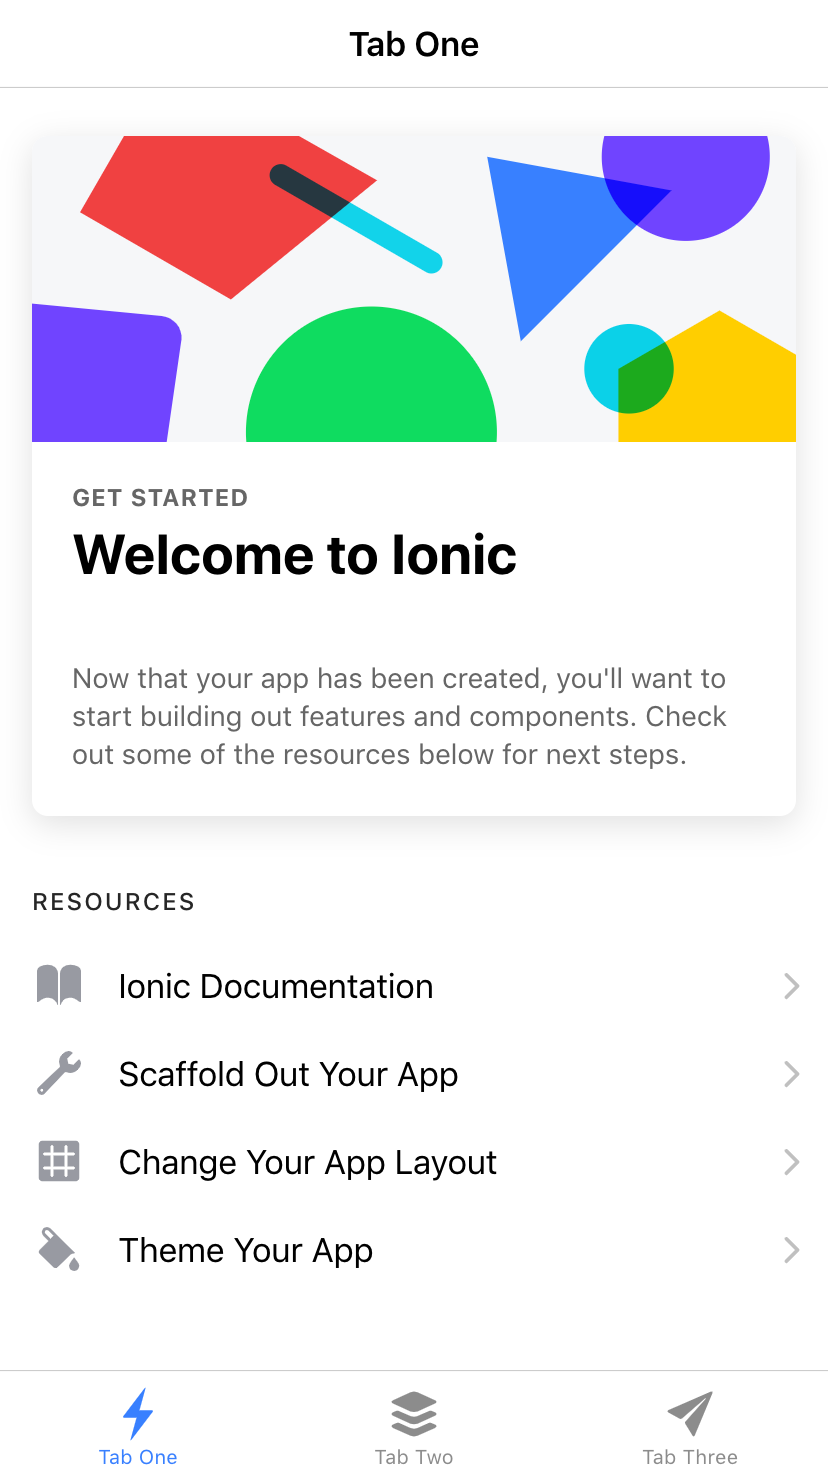
Once done, you will see your starter app up and running:
Next, let’s take a tour of what a stock Ionic React app consists of.
Open up the project in your favorite code editor and leave the ionic serve command running. Any changes we make will automatically be recompiled and refresh the app in the browser.
An Ionic React project is just a React project, with the setup you would normally find from a CRA app. One difference you might notice is that we use TypeScript.
We are big fans of TypeScript at Ionic, and we believe TypeScript in React provides a great, productive experience. However, if you want to use plain JavaScript, rename the files to use a .js extension and remove any of the type annotations from within the file, and your Ionic React app will now be a JavaScript app!
The src folder contains all the code for the app. The main entry point is the App.tsx file. Let’s break down what’s happening in this file.
At the top, we have the typical React and React Router imports, and then a series of imports from @ionic/react. Each of our Ionic components is exported as its own individual React component. In essence, Ionic React is a wrapper around the web components we have in the Ionic Core project but exported in a way that makes them feel native to a React developer. Any updates and enhancements we make to Ionic Core will automatically be available in Ionic React.
Next, we import a series of core CSS files. After those, there is also a variables.css file, which you can use to customize the theme of your app. For more info on theming your app, check out our doc on the subject.
Next, we have the main App component. Notice that in the starters, we are using 100% functional components. We are fans of this approach, but if you prefer class-based components, those work great as well.
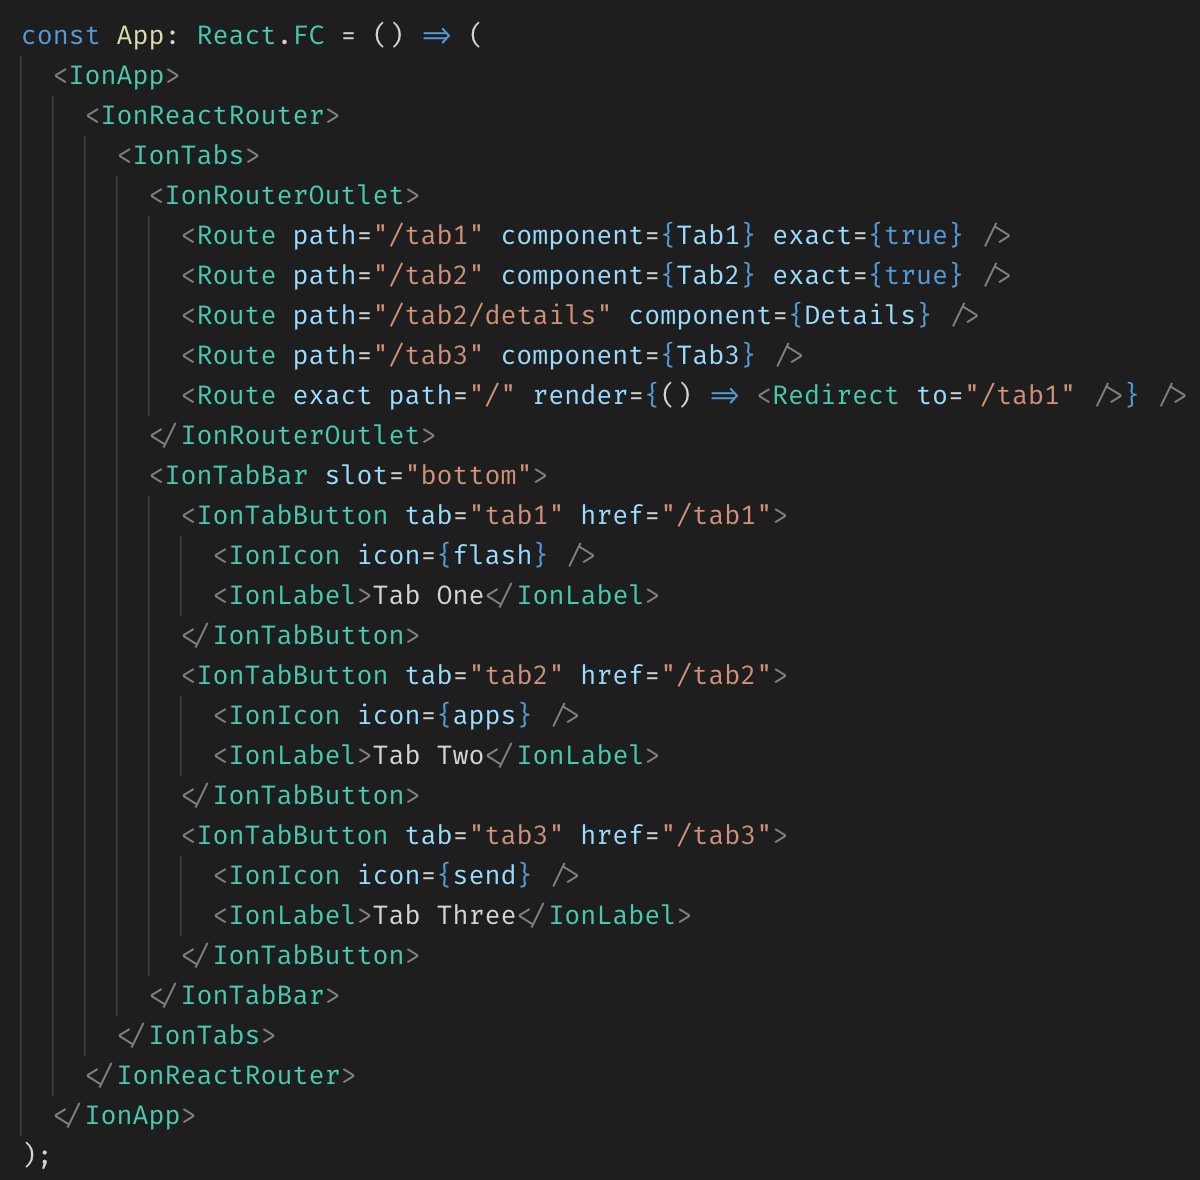
Each Ionic app starts with the IonApp component, which is the base container, and helps set up the screen to work great on both mobile and desktop. Next, the IonReactRouter component is a wrapper around the React Router library’s BrowserRouter component. To do the native-like page transitions and to maintain the state of the pages as you browse through your app, we augment React Router with some additional functionality. Visit our Navigation & Routing guide for more info on how routing works in Ionic React.
The bulk of our tabs starter is now in the IonTabs component. The IonRouterOutlet contains a series of Routes (from React Router) for each of the pages in the tab interface.
Next, the IonTabBar component contains the bottom tab bar with a button for each of the pages, which forward to the Tab1, Tab2, and Tab3 components in the src/pages folder. The Tab1 and Tab2 pages have good examples on how to use some common Ionic components, but the Tab3 page is relatively bare. Let’s change that.
We will set up our empty tab to be a page to show a list of employees, with some demo data being pulled from the UIFaces project.
First, let’s update the tab bar in App.tsx to show a new label and icon:
<IonTabButton tab="tab3" href="/tab3">
    <IonIcon icon={people} />
    <IonLabel>Employees</IonLabel>
</IonTabButton>
The
peopleicon is imported from ‘ionicons/icons’
Open up Tab3.tsx, and replace the contents of the file with:
import { IonAvatar, IonContent, IonHeader, IonItem, IonLabel, IonList, IonPage, IonTitle, IonToolbar, useIonViewWillEnter } from '@ionic/react';
import React, { useState } from 'react';

interface Person {
  name: string;
  email: string;
  position: string;
  photo: string;
}

const Tab3Page: React.FC = () => {

  const [people, setPeople] = useState<Person[]>([]);

  useIonViewWillEnter(async () => {
    const result = await fetch('https://uifaces.co/api?limit=25', {
      headers: { 'x-API-KEY': '873771d7760b846d51d025ac5804ab' }
    });
    const data = await result.json();
    setPeople(data);
  });

  return (
    <IonPage>
      <IonHeader>
        <IonToolbar>
          <IonTitle>Employees</IonTitle>
        </IonToolbar>
      </IonHeader>
      <IonContent>
        <IonList>
          {people.map((person, idx) => <EmployeeItem key={idx} person={person} />)}
        </IonList>
      </IonContent>
    </IonPage>
  );
};

const EmployeeItem: React.FC<{ person: Person }> = ({ person }) => {
  return (
    <IonItem >
      <IonAvatar slot="start">
        <img src={person.photo} />
      </IonAvatar>
      <IonLabel>
        <h2>{person.name}</h2>
        <p>{person.position}</p>
      </IonLabel>
    </IonItem>
  );
}

export default Tab3Page;
First, we define a TypeScript interface for a Person, which will give us some type safety and code completion when using the employees a bit later on.
At the top, we import a couple of React hooks to use, the first is useState, which allows us to use state in our functional components, and the second is useIonViewWillEnter, which is a lifecycle method provided by Ionic that will fire each time the view comes into view. Find out more about Ionic lifecycle methods here.
We provide a function to the useIonViewWillEnter hook that will fire that will call into the UIFaces API (using the fetch API) and return a list of twenty-five people. When the fetch request finishes, we call setPeople to update the people state variable.
In the JSX, we have an ‘IonList’ component, which contains an EmployeeItem for each of the people. We separate out the EmployeeItem into its own component (defined a bit farther down).
With the updates to Tab3, we can now get a list of employees:

That is the basics on getting up and running with an Ionic React app! For a more in-depth tutorial, check out our getting started guide.
When you’re ready to build for native mobile (iOS and Android), check out Capacitor, our native app runtime.
Thanks
We’re thrilled about Ionic React, and can’t wait to see what you build with it. We’ve got a lot planned for Ionic React, so let us know in the comments below what type of content you’d like to see us cover. You can also reach out on Twitter by following us @ionicframework!
Until next time.


