Vue Navigation
This guide covers how routing works in an app built with Ionic and Vue.
The IonRouterOutlet component uses the popular Vue Router library under the hood. With Ionic and Vue Router, you can create multi-page apps with rich page transitions.
Everything you know about routing using Vue Router carries over into Ionic Vue. Let's take a look at the basics of an Ionic Vue app and how routing works with it.
A Brief Note
While reading this guide, you may notice that most of these concepts are very similar to the concepts found in Vue Router without Ionic Framework. Your observation would be correct! Ionic Vue leverages the best parts of Vue Router to make the transition to building apps with Ionic Framework as seamless as possible. As a result, we recommend relying on Vue Router features as much as possible rather than trying to build your own routing solutions.
A Simple Route
Here is a sample routing configuration that defines a single route to the "/home" URL. When you visit "/home", the route renders the HomePage component.
router/index.ts
import { createRouter, createWebHistory } from '@ionic/vue-router';
import { RouteRecordRaw } from 'vue-router';
import HomePage from '@/views/Home.vue';

const routes: Array<RouteRecordRaw> = [
  {
    path: '/',
    name: 'Home',
    component: HomePage,
  },
];

const router = createRouter({
  history: createWebHistory(process.env.BASE_URL),
  routes,
});

export default router;
On the app's initial load, the app will render the HomePage component as that is what is configured here.
Handling Redirects
What if we wanted to land a different path on our initial load? For this, we can use router redirects. Redirects work the same way that a typical route object does, but just includes some different keys:
const routes: Array<RouteRecordRaw> = [
  {
    path: '/',
    redirect: '/home',
  },
  {
    path: '/home',
    name: 'Home',
    component: HomePage,
  },
];
In our redirect, we look for the index path of our app. Then if we load that, we redirect to the home route.
Navigating to Different Routes
This is all great, but how does one actually navigate to a route? For this, we can use the router-link property. Let's create a new routing setup:
const routes: Array<RouteRecordRaw> = [
  {
    path: '/',
    redirect: '/home',
  },
  {
    path: '/home',
    name: 'Home',
    component: HomePage,
  },
  {
    path: '/detail',
    name: 'Detail',
    component: DetailPage,
  },
];
Say we start on the home route, and we want to add a button that takes us to the detail route. We can do this using the following HTML to navigate to the detail route:
<ion-button router-link="/detail">Go to detail</ion-button>
We can also programmatically navigate in our app by using the router API:
<template>
  <ion-page>
    <ion-content>
      <ion-button @click="() => router.push('/detail')">Go to detail</ion-button>
    </ion-content>
  </ion-page>
</template>

<script setup lang="ts">
import { IonButton, IonContent, IonPage } from '@ionic/vue';
import { useRouter } from 'vue-router';

const router = useRouter();
</script>
Both options provide the same navigation mechanism, just fitting different use cases.
Navigating using router-link
The router-link attribute can be set on any Ionic Vue component, and the router will navigate to the route specified when the component is clicked. The router-link attribute accepts string values as well as named routes, just like router.push from Vue Router. For additional control, the router-direction and router-animation attributes can be set as well.
The router-direction attribute accepts values of "forward", "back", or "root" and is used to control the direction of the page transition.
The router-animation attribute accepts an AnimationBuilder function and is used to provide a custom page transition that is only used when clicking the component it is provided on. The AnimationBuilder type is a function that returns an Ionic Animation instance. See the Animations documentation for more information on using animations in Ionic Vue.
<ion-button router-link="/page2" router-direction="back" :router-animation="myAnimation">Click Me</ion-button>
Navigating using useIonRouter
One downside of using router-link is that you cannot run custom code prior to navigating. This makes tasks such as firing off a network request prior to navigation difficult. You could use Vue Router directly, but then you lose the ability to control the page transition. This is where the useIonRouter utility is helpful.
The useIonRouter utility is a function that provides methods for programmatic navigation while having full control over the page transitions. This makes it easy to run custom code before navigating.
This first example lets us push a new page onto the stack with a custom page transition:
import { useIonRouter } from '@ionic/vue';
import { customAnimation } from '@/animations/customAnimation';

const ionRouter = useIonRouter();
ionRouter.push('/page2', customAnimation);
useIonRouter provides convenience push, replace, back, and forward methods to make it easy to use common navigation actions. It also provides a navigate method which can be used in more complex navigation scenarios:
import { useIonRouter } from '@ionic/vue';
import { customAnimation } from '@/animations/customAnimation';

const ionRouter = useIonRouter();
ionRouter.navigate('/page2', 'forward', 'replace', customAnimation);
The example above has the app navigate to /page2 with a custom animation that uses the forward direction. In addition, the replace value ensures that the app replaces the current history entry when navigating.
useIonRouter uses the Vue inject() function and should only be used inside of your setup() function.
See the useIonRouter documentation for more details as well as type information.
Navigating using router.go
Vue Router has a router.go method that allows developers to move forward or backward through the application history. Let's take a look at an example.
Say you have the following application history:
/pageA --> /pageB --> /pageC
If you were to call router.go(-2) on /pageC, you would be brought back to /pageA. If you then called router.go(2), you would be brought to /pageC.
A key characteristic of router.go() is that it expects your application history to be linear. This means that router.go() should not be used in applications that make use of non-linear routing. See Linear Routing versus Non-Linear Routing for more information.
Lazy Loading Routes
The current way our routes are setup makes it so they are included in the same initial chunk when loading the app, which is not always ideal. Instead, we can set up our routes so that components are loaded as they are needed:
const routes: Array<RouteRecordRaw> = [
  {
    path: '/',
    redirect: '/home',
  },
  {
    path: '/home',
    name: 'Home',
    component: HomePage,
  },
  {
    path: '/detail',
    name: 'Detail',
    component: () => import('@/views/DetailPage.vue'),
  },
];
Here, we have the same setup as before only this time DetailPage has been replaced with an import call. This will result in the DetailPage component no longer being part of the chunk that is requested on application load.
Linear Routing versus Non-Linear Routing
Linear Routing
If you have built a web app that uses routing, you likely have used linear routing before. Linear routing means that you can move forward or backward through the application history by pushing and popping pages.
The following is an example of linear routing in a mobile app:
The application history in this example has the following path:
Accessibility --> VoiceOver --> Speech
When we press the back button, we follow that same routing path except in reverse. Linear routing is helpful in that it allows for simple and predictable routing behaviors. It also means we can use Vue Router APIs such as router.go().
The downside of linear routing is that it does not allow for complex user experiences such as tab views. This is where non-linear routing comes into play.
Non-Linear Routing
Non-linear routing is a concept that may be new to many web developers learning to build mobile apps with Ionic.
Non-linear routing means that the view that the user should go back to is not necessarily the previous view that was displayed on the screen.
The following is an example of non-linear routing:
In the example above, we start on the Originals tab. Tapping a card brings us to the Ted Lasso view within the Originals tab.
From here, we switch to the Search tab. Then, we tap the Originals tab again and are brought back to the Ted Lasso view. At this point, we have started using non-linear routing.
Why is this non-linear routing? The previous view we were on was the Search view. However, pressing the back button on the Ted Lasso view should bring us back to the root Originals view. This happens because each tab in a mobile app is treated as its own stack. The Working with Tabs sections goes over this in more detail.
If tapping the back button simply called router.go(-1) from the Ted Lasso view, we would be brought back to the Search view which is not correct.
Non-linear routing allows for sophisticated user flows that linear routing cannot handle. However, certain linear routing APIs such as router.go() cannot be used in this non-linear environment. This means that router.go() should not be used when using tabs or nested outlets.
Which one should I choose?
We recommend keeping your application as simple as possible until you need to add non-linear routing. Non-linear routing is very powerful, but it also adds a considerable amount of complexity to mobile applications.
The two most common uses of non-linear routing is with tabs and nested ion-router-outlets. We recommend only using non-linear routing if your application meets the tabs or nested router outlet use cases.
For more on tabs, please see Working with Tabs.
For more on nested router outlets, please see Nested Routes.
Shared URLs versus Nested Routes
A common point of confusion when setting up routing is deciding between shared URLs or nested routes. This part of the guide will explain both and help you decide which one to use.
Shared URLs
Shared URLs is a route configuration where routes have pieces of the URL in common. The following is an example of a shared URL configuration:
const routes: Array<RouteRecordRaw> = [
  {
    path: '/dashboard',
    component: DashboardMainPage,
  },
  {
    path: '/dashboard/stats',
    component: DashboardStatsPage,
  },
];
The above routes are considered "shared" because they reuse the dashboard piece of the URL.
Nested Routes
Nested Routes is a route configuration where routes are listed as children of other routes. The following is an example of a nested route configuration:
const routes: Array<RouteRecordRaw> = [
  {
    path: '/dashboard/:id',
    component: DashboardRouterOutlet,
    children: [
      {
        path: '',
        component: DashboardMainPage,
      },
      {
        path: 'stats',
        component: DashboardStatsPage,
      },
    ],
  },
];
The above routes are nested because they are in the children array of the parent route. Notice that the parent route renders the DashboardRouterOutlet component. When you nest routes, you need to render another instance of ion-router-outlet.
Which one should I choose?
Shared URLs are great when you want to transition from page A to page B while preserving the relationship between the two pages in the URL. In our previous example, a button on the /dashboard page could transition to the /dashboard/stats page. The relationship between the two pages is preserved because of a) the page transition and b) the url.
Nested routes should be used when you want to render content in outlet A while also rendering sub-content inside of a nested outlet B. The most common use case you will run into is tabs. When you load up a tabs Ionic starter application, you will see ion-tab-bar and ion-tabs components rendered in the first ion-router-outlet. The ion-tabs component renders another ion-router-outlet which is responsible for rendering the contents of each tab.
There are very few use cases in which nested routes make sense in mobile applications. When in doubt, use the shared URL route configuration. We strongly caution against using nested routing in contexts other than tabs as it can quickly make navigating your app confusing.
Working with Tabs
When working with tabs, Ionic Vue needs a way to know which view belongs to which tab. The IonTabs component comes in handy here, but let's look at what the routing setup for this looks like:
const routes: Array<RouteRecordRaw> = [
  {
    path: '/',
    redirect: '/tabs/tab1',
  },
  {
    path: '/tabs/',
    component: Tabs,
    children: [
      {
        path: '',
        redirect: 'tab1',
      },
      {
        path: 'tab1',
        component: () => import('@/views/Tab1.vue'),
      },
      {
        path: 'tab2',
        component: () => import('@/views/Tab2.vue'),
      },
      {
        path: 'tab3',
        component: () => import('@/views/Tab3.vue'),
      },
    ],
  },
];
Here, our tabs path loads a Tabs component. We provide each tab as a route object inside of the children array. In this example, we call the path tabs, but this can be customized.
Let's start by taking a look at our Tabs component:
<template>
  <ion-page>
    <ion-tabs>
      <ion-router-outlet></ion-router-outlet>
      <ion-tab-bar slot="bottom">
        <ion-tab-button tab="tab1" href="/tabs/tab1">
          <ion-icon :icon="triangle" />
          <ion-label>Tab 1</ion-label>
        </ion-tab-button>

        <ion-tab-button tab="tab2" href="/tabs/tab2">
          <ion-icon :icon="ellipse" />
          <ion-label>Tab 2</ion-label>
        </ion-tab-button>

        <ion-tab-button tab="tab3" href="/tabs/tab3">
          <ion-icon :icon="square" />
          <ion-label>Tab 3</ion-label>
        </ion-tab-button>
      </ion-tab-bar>
    </ion-tabs>
  </ion-page>
</template>

<script setup lang="ts">
import { IonTabBar, IonTabButton, IonTabs, IonLabel, IonIcon, IonPage, IonRouterOutlet } from '@ionic/vue';
import { ellipse, square, triangle } from 'ionicons/icons';
</script>
If you have worked with Ionic Framework before, this should feel familiar. We create an ion-tabs component and provide an ion-tab-bar. The ion-tab-bar provides ion-tab-button components, each with a tab property that is associated with its corresponding tab in the router config. We also provide an ion-router-outlet to give ion-tabs an outlet to render the different tab views in.
How Tabs in Ionic Work
Each tab in Ionic is treated as an individual navigation stack. This means if you have three tabs in your application, each tab has its own navigation stack. Within each stack you can navigate forwards (push a view) and backwards (pop a view).
This behavior is important to note as it is different than most tab implementations that are found in other web based UI libraries. Other libraries typically manage tabs as one single history stack.
Since Ionic is focused on helping developers build mobile apps, the tabs in Ionic are designed to match native mobile tabs as closely as possible. As a result, there may be certain behaviors in Ionic's tabs that differ from tabs implementations you have seen in other UI libraries. Read on to learn more about some of these differences.
Child Routes within Tabs
When adding additional routes to tabs you should write them as sibling routes with the parent tab as the path prefix. The example below defines the /tabs/tab1/view route as a sibling of the /tabs/tab1 route. Since this new route has the tab1 prefix, it will be rendered inside of the Tabs component, and Tab 1 will still be selected in the ion-tab-bar.
const routes: Array<RouteRecordRaw> = [
  {
    path: '/',
    redirect: '/tabs/tab1',
  },
  {
    path: '/tabs/',
    component: Tabs,
    children: [
      {
        path: '',
        redirect: 'tab1',
      },
      {
        path: 'tab1',
        component: () => import('@/views/Tab1.vue'),
      },
      {
        path: 'tab1/view',
        component: () => import('@/views/Tab1View.vue'),
      },
      {
        path: 'tab2',
        component: () => import('@/views/Tab2.vue'),
      },
      {
        path: 'tab3',
        component: () => import('@/views/Tab3.vue'),
      },
    ],
  },
];
Switching Between Tabs
Since each tab is its own navigation stack, it is important to note that these navigation stacks should never interact. This means that there should never be a button in Tab 1 that routes a user to Tab 2. In other words, tabs should only be changed by the user tapping a tab button in the tab bar.
A good example of this in practice is the iOS App Store and Google Play Store mobile applications. These apps both provide tabbed interfaces, but neither one ever routes the user across tabs. For example, the "Games" tab in the iOS App Store app never directs users to the "Search" tab and vice versa.
Let's take a look at a couple common mistakes that are made with tabs.
A Settings Tab That Multiple Tabs Reference
A common practice is to create a Settings view as its own tab. This is great if developers need to present several nested settings menus. However, other tabs should never try to route to the Settings tab. As we mentioned above, the only way that the Settings tab should be activated is by a user tapping the appropriate tab button.
If you find that your tabs need to reference the Settings tab, we recommend making the Settings view a modal by using ion-modal. This is a practice found in the iOS App Store app. With this approach, any tab can present the modal without breaking the mobile tabs pattern of each tab being its own stack.
The example below shows how the iOS App Store app handles presenting an "Account" view from multiple tabs. By presenting the "Account" view in a modal, the app can work within the mobile tabs best practices to show the same view across multiple tabs.
Reusing Views Across Tabs
Another common practice is to present the same view in multiple tabs. Developers often try to do this by having the view contained in a single tab, with other tabs routing to that tab. As we mentioned above, this breaks the mobile tabs pattern and should be avoided.
Instead, we recommend having routes in each tab that reference the same component. This is a practice done in popular apps like Spotify. For example, you can access an album or podcast from the "Home", "Search", and "Your Library" tabs. When accessing the album or podcast, users stay within that tab. The app does this by creating routes per tab and sharing a common component in the codebase.
The example below shows how the Spotify app reuses the same album component to show content in multiple tabs. Notice that each screenshot shows the same album but from a different tab.
| Home Tab | Search Tab |
|---|---|
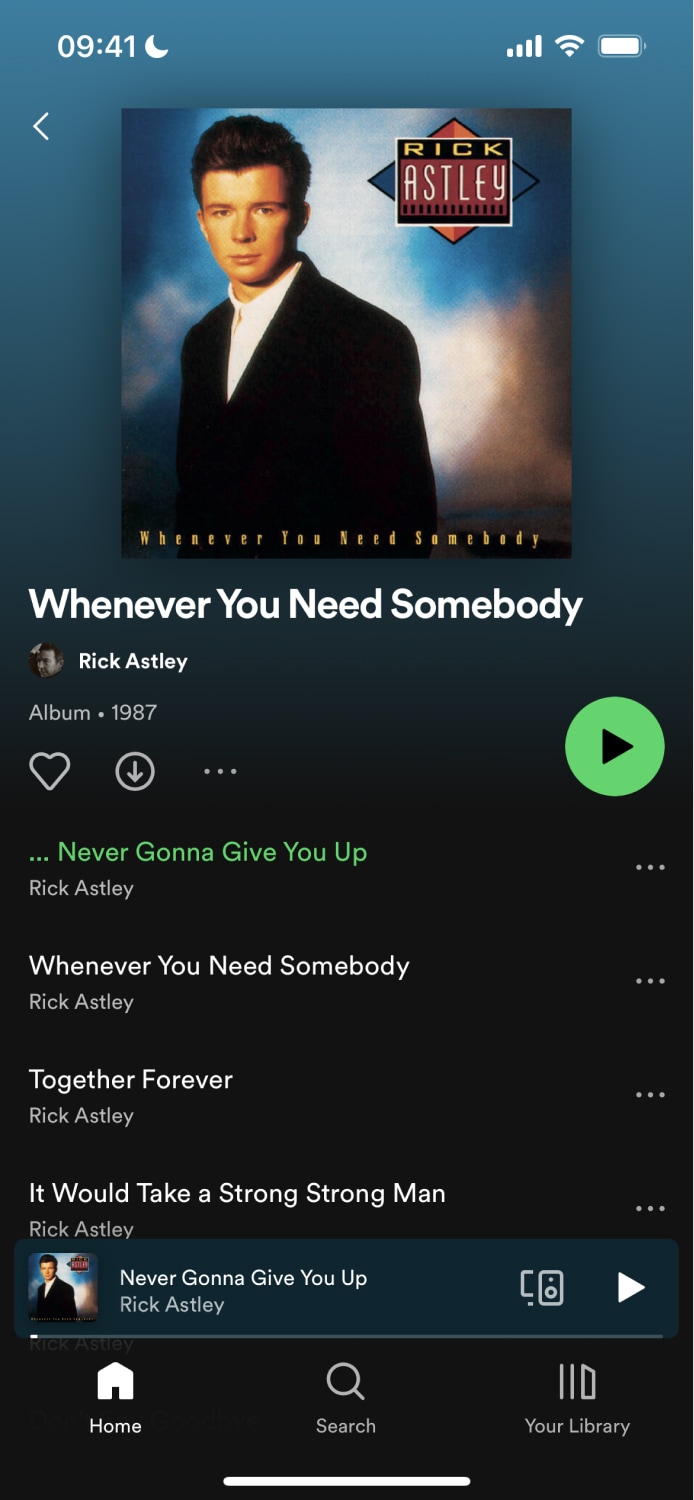 | 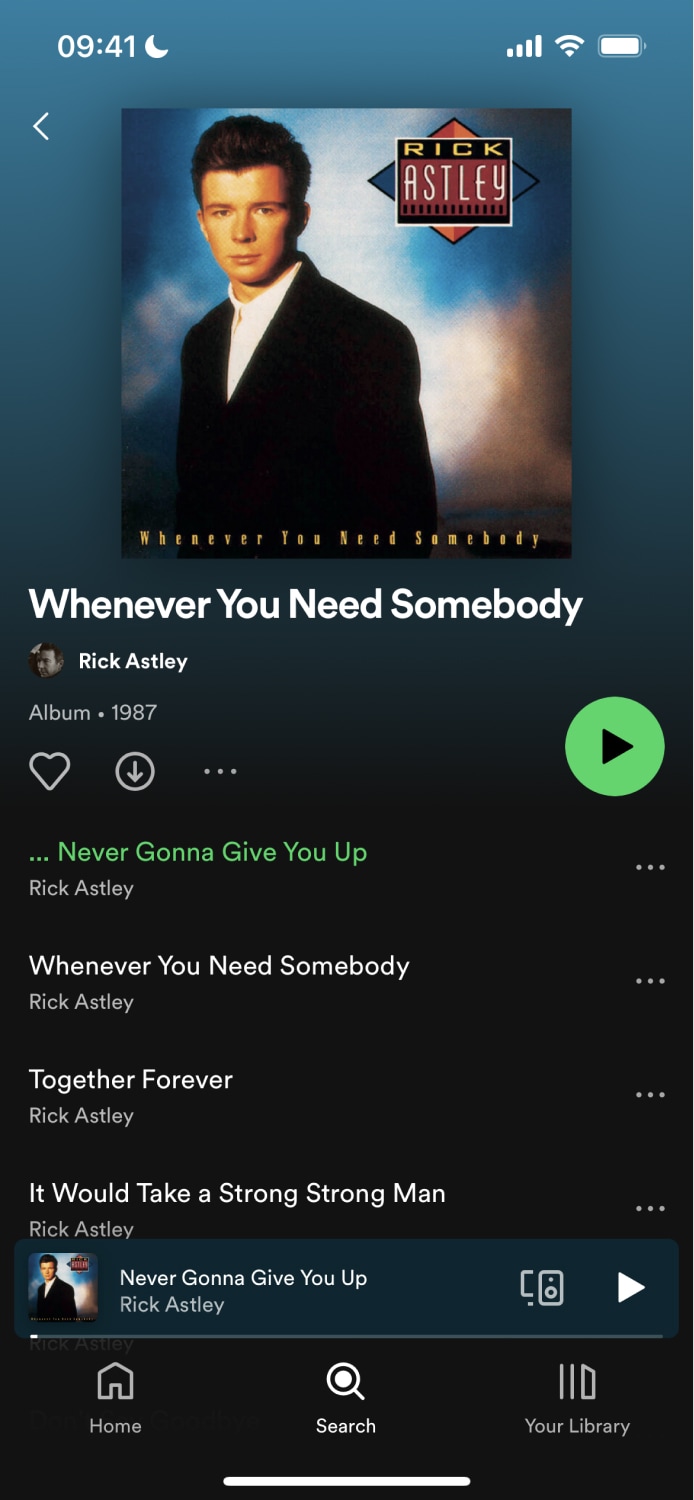 |
Components
IonRouterOutlet
The IonRouterOutlet component provides a container to render your views in. It is similar to the RouterView component found in other Vue applications except that IonRouterOutlet can render multiple pages in the DOM in the same outlet. When a component is rendered in IonRouterOutlet we consider this to be an Ionic Framework "page". The router outlet container controls the transition animation between the pages as well as controls when a page is created and destroyed. This helps maintain the state between the views when switching back and forth between them.
Nothing should be provided inside of IonRouterOutlet when setting it up in your template. While IonRouterOutlet can be nested in child components, we caution against it as it typically makes navigation in apps confusing. See Shared URLs versus Nested Routes for more information.
IonPage
The IonPage component wraps each view in an Ionic Vue app and allows page transitions and stack navigation to work properly. Each view that is navigated to using the router must include an IonPage component.
IonPage is also required for proper styling. It provides a flex container that ensures page content, such as IonContent, is properly sized and does not overlap other UI elements like IonTabBar.
<template>
  <ion-page>
    <ion-header>
      <ion-toolbar>
        <ion-title>Home</ion-title>
      </ion-toolbar>
    </ion-header>
    <ion-content class="ion-padding">Hello World</ion-content>
  </ion-page>
</template>

<script setup lang="ts">
import { IonContent, IonHeader, IonPage, IonTitle, IonToolbar } from '@ionic/vue';
</script>
Components presented via IonModal or IonPopover do not typically need an IonPage component unless you need a wrapper element. In that case, we recommend using IonPage so that the component dimensions are still computed properly.
Functions
useIonRouter
▸ useIonRouter(): UseIonRouterResult
Returns the Ionic router instance, containing API methods for navigating, customizing page transitions and routing context for native features. This function can be used in combination with the useRouter function from Vue.
For example usages, please refer to our Utility Functions.
URL Parameters
Let's expand upon our original routing example to show how we can use URL parameters. We recommend passing URL parameters as props so that the component does not need a direct reference to the router, which makes it easier to reuse and test in isolation.
const routes: Array<RouteRecordRaw> = [
  {
    path: '/',
    redirect: '/home',
  },
  {
    path: '/home',
    name: 'Home',
    component: HomePage,
  },
  {
    path: '/detail/:id',
    name: 'Detail',
    component: DetailPage,
    props: true,
  },
];
Notice that we have now added :id to the end of our detail path string. URL parameters are dynamic portions of our route paths. When the user navigates to a URL such as /details/1 the "1" is saved to a parameter named "id" which can be accessed in the component when the route renders. Setting props: true on the route record tells Vue Router to pass the matched URL parameters to the component as props.
Let's look at how to use it in our component:
<template>
  <ion-page>
    <ion-header>
      <ion-toolbar>
        <ion-title>Details</ion-title>
      </ion-toolbar>
    </ion-header>

    <ion-content> Detail ID: {{ id }} </ion-content>
  </ion-page>
</template>

<script setup lang="ts">
import { IonContent, IonHeader, IonPage, IonTitle, IonToolbar } from '@ionic/vue';

defineProps<{ id: string }>();
</script>
The id parameter from the URL is received as a prop and rendered on the screen. The component has no dependency on the router itself.
Router History
Vue Router ships with a configurable history mode. Let's look at the different options and why you might want to use each one.
-
createWebHistory: This option creates an HTML5 history. It leverages the History API to achieve URL navigation without a page reload. This is the most common history mode for single page applications. When in doubt, usecreateWebHistory. -
createWebHashHistory: This option adds a hash (#) to your URL. This is useful for web applications with no host or when you do not have full control over the server routes. Search engines sometimes ignore hash fragments, so you should usecreateWebHistoryinstead if SEO is important for your application. -
createMemoryHistory: This option creates an in-memory based history. This is mainly used to handle server-side rendering (SSR).
More Information
For more info on routing in Vue using Vue Router, check out their docs at http://router.vuejs.org/.