Vueナビゲーション
このガイドでは、Ionic と Vue で構築されたアプリでルーティングがどのように機能するかについて説明します。
IonRouterOutlet コンポーネントは、内部で一般的な Vue Router ライブラリを使用します。Ionic と Vue Router を使えば、リッチなページ遷移を持つマルチページアプリを作ることができます。
Vue Router を使ったルーティングについて知っていることはすべて Ionic Vue に引き継がれます。Ionic Vue アプリの基本とルーティングの仕組みを見てみましょう。
簡単なメモ
このガイドを読んでいると、これらのコンセプトのほとんどが、Ionic Framework を使わずに Vue Router で見られるコンセプトと非常に似ていることに気がつくかもしれません。あなたの観察は正しいでしょう! Ionic Vue は、Ionic Framework でアプリを構築するための移行をできるだけシームレスにするために、Vue Router の最良の部分を活用しています。そのため、独自のルーティングソリューションを構築しようとするよりも、できるだけ Vue Router の機能に依存することをお勧めします。
簡単な Route
次に示すのは、 "/home" URL への単一のルートを定義するルーティング設定の例です。 "/home" にアクセスすると、ルートによって HomePage コンポーネントがレンダリングされます。
router/index.ts
import { createRouter, createWebHistory } from '@ionic/vue-router';
import { RouteRecordRaw } from 'vue-router';
import HomePage from '@/views/Home.vue';

const routes: Array<RouteRecordRaw> = [
  {
    path: '/',
    name: 'Home',
    component: HomePage,
  },
];

const router = createRouter({
  history: createWebHistory(process.env.BASE_URL),
  routes,
});

export default router;
アプリケーションが最初にロードされると、 HomePage コンポーネントがここで設定したとおりに表示されます。
リダイレクトの設定
最初ロードされたパスに別のパスを設定したい場合はどうすればよいでしょうか。これには、ルータリ��ダイレクトを使用できます。リダイレクトは通常のルートオブジェクトと同じように機能しますが、いくつかの異なるキーが含まれています。
const routes: Array<RouteRecordRaw> = [
  {
    path: '/',
    redirect: '/home',
  },
  {
    path: '/home',
    name: 'Home',
    component: HomePage,
  },
];
このリダイレクトでは、最初にインデックスのパスが参照されます。そして、 home route にリダイレクトしてロードを行います。
異なる Routes へのナビゲーション
これは素晴らしいことですが、実際にルートにナビゲートするにはどうすればよいのでしょうか。これには、 router-link プロパティを使用できます。新しいルーティング設定を作成します:
const routes: Array<RouteRecordRaw> = [
  {
    path: '/',
    redirect: '/home',
  },
  {
    path: '/home',
    name: 'Home',
    component: HomePage,
  },
  {
    path: '/detail',
    name: 'Detail',
    component: DetailPage,
  },
];
home route で開始し、detail route に移動するボタンを追加するとします。detail route に移動するには、次の HTML を使用します:
<ion-button router-link="/detail">Go to detail</ion-button>
また、ルーター API を使用して、プログラムでアプリケーション内を移動することもできます:
<template>
  <ion-page>
    <ion-content>
      <ion-button @click="() => router.push('/detail')">Go to detail</ion-button>
    </ion-content>
  </ion-page>
</template>

<script setup lang="ts">
import { IonButton, IonContent, IonPage } from '@ionic/vue';
import { useRouter } from 'vue-router';

const router = useRouter();
</script>
どちらのオプションも同じナビゲーション機構を提供し、異なるユースケースに対応します。
Navigating using router-link
The router-link attribute can be set on any Ionic Vue component, and the router will navigate to the route specified when the component is clicked. The router-link attribute accepts string values as well as named routes, just like router.push from Vue Router. For additional control, the router-direction and router-animation attributes can be set as well.
The router-direction attribute accepts values of "forward", "back", or "root" and is used to control the direction of the page transition.
The router-animation attribute accepts an AnimationBuilder function and is used to provide a custom page transition that is only used when clicking the component it is provided on. The AnimationBuilder type is a function that returns an Ionic Animation instance. See the Animations documentation for more information on using animations in Ionic Vue.
<ion-button router-link="/page2" router-direction="back" :router-animation="myAnimation">Click Me</ion-button>
Navigating using useIonRouter
One downside of using router-link is that you cannot run custom code prior to navigating. This makes tasks such as firing off a network request prior to navigation difficult. You could use Vue Router directly, but then you lose the ability to control the page transition. This is where the useIonRouter utility is helpful.
The useIonRouter utility is a function that provides methods for programmatic navigation while having full control over the page transitions. This makes it easy to run custom code before navigating.
This first example lets us push a new page onto the stack with a custom page transition:
import { useIonRouter } from '@ionic/vue';
import { customAnimation } from '@/animations/customAnimation';

const ionRouter = useIonRouter();
ionRouter.push('/page2', customAnimation);
useIonRouter provides convenience push, replace, back, and forward methods to make it easy to use common navigation actions. It also provides a navigate method which can be used in more complex navigation scenarios:
import { useIonRouter } from '@ionic/vue';
import { customAnimation } from '@/animations/customAnimation';

const ionRouter = useIonRouter();
ionRouter.navigate('/page2', 'forward', 'replace', customAnimation);
The example above has the app navigate to /page2 with a custom animation that uses the forward direction. In addition, the replace value ensures that the app replaces the current history entry when navigating.
useIonRouter uses the Vue inject() function and should only be used inside of your setup() function.
See the useIonRouter documentation for more details as well as type information.
Navigating using router.go
Vue Router has a router.go method that allows developers to move forward or backward through the application history. Let's take a look at an example.
Say you have the following application history:
/pageA --> /pageB --> /pageC
If you were to call router.go(-2) on /pageC, you would be brought back to /pageA. If you then called router.go(2), you would be brought to /pageC.
A key characteristic of router.go() is that it expects your application history to be linear. This means that router.go() should not be used in applications that make use of non-linear routing. See Linear Routing versus Non-Linear Routing for more information.
Lazy Loading Routes
現在の route の設定方法では、アプリをロードするときに同じ初期チャンクに含まれるようになっているが、これは必ずしも理想的ではありません。代わりに、必要に応じてコンポーネントがロードされるように route を設定できます。
const routes: Array<RouteRecordRaw> = [
  {
    path: '/',
    redirect: '/home',
  },
  {
    path: '/home',
    name: 'Home',
    component: HomePage,
  },
  {
    path: '/detail',
    name: 'Detail',
    component: () => import('@/views/DetailPage.vue'),
  },
];
Here, we have the same setup as before only this time DetailPage has been replaced with an import call. This will result in the DetailPage component no longer being part of the chunk that is requested on application load.
Linear Routing versus Non-Linear Routing
Linear Routing
If you have built a web app that uses routing, you likely have used linear routing before. Linear routing means that you can move forward or backward through the application history by pushing and popping pages.
The following is an example of linear routing in a mobile app:
The application history in this example has the following path:
Accessibility --> VoiceOver --> Speech
When we press the back button, we follow that same routing path except in reverse. Linear routing is helpful in that it allows for simple and predictable routing behaviors. It also means we can use Vue Router APIs such as router.go().
The downside of linear routing is that it does not allow for complex user experiences such as tab views. This is where non-linear routing comes into play.
Non-Linear Routing
Non-linear routing is a concept that may be new to many web developers learning to build mobile apps with Ionic.
Non-linear routing means that the view that the user should go back to is not necessarily the previous view that was displayed on the screen.
The following is an example of non-linear routing:
In the example above, we start on the Originals tab. Tapping a card brings us to the Ted Lasso view within the Originals tab.
From here, we switch to the Search tab. Then, we tap the Originals tab again and are brought back to the Ted Lasso view. At this point, we have started using non-linear routing.
Why is this non-linear routing? The previous view we were on was the Search view. However, pressing the back button on the Ted Lasso view should bring us back to the root Originals view. This happens because each tab in a mobile app is treated as its own stack. The Working with Tabs sections goes over this in more detail.
If tapping the back button simply called router.go(-1) from the Ted Lasso view, we would be brought back to the Search view which is not correct.
Non-linear routing allows for sophisticated user flows that linear routing cannot handle. However, certain linear routing APIs such as router.go() cannot be used in this non-linear environment. This means that router.go() should not be used when using tabs or nested outlets.
Which one should I choose?
We recommend keeping your application as simple as possible until you need to add non-linear routing. Non-linear routing is very powerful, but it also adds a considerable amount of complexity to mobile applications.
The two most common uses of non-linear routing is with tabs and nested ion-router-outlets. We recommend only using non-linear routing if your application meets the tabs or nested router outlet use cases.
For more on tabs, please see Working with Tabs.
For more on nested router outlets, please see Nested Routes.
Shared URLs versus Nested Routes
A common point of confusion when setting up routing is deciding between shared URLs or nested routes. This part of the guide will explain both and help you decide which one to use.
共有 URL
共有 URL は、ルートが共通の URL の一部を持つルート設定です。共有 URL 設定の例を次に示します:
const routes: Array<RouteRecordRaw> = [
  {
    path: '/dashboard',
    component: DashboardMainPage,
  },
  {
    path: '/dashboard/stats',
    component: DashboardStatsPage,
  },
];
上記のルートは、URL の dashboard 部分を再利用するため、 "shared" と見なされます。
ネストされた Route
Nested Routes は、ルートが他のルートの子としてリストされるルート設定です。ネストされたルート設定の例を次に示します:
const routes: Array<RouteRecordRaw> = [
  {
    path: '/dashboard/:id',
    component: DashboardRouterOutlet,
    children: [
      {
        path: '',
        component: DashboardMainPage,
      },
      {
        path: 'stats',
        component: DashboardStatsPage,
      },
    ],
  },
];
上記のルートは、親ルートの children 配列にあるため、ネストされています。親ルートが DashboardRouterOutlet コンポーネントをレンダリングしていることに注目してください。ルートをネストする場合は、 ion-router-outlet の別のインスタンスをレンダリングする必要があります。
どちらを選ぶべきか
共有 URL は、URL の 2 つのページ間の関係を維持しながら、ページ A からページ B に遷移する場合に便利です。前述の例では、 /dashboard ページのボタンで /dashboard/stats ページに移行できます。2 つのページ間の関係は、a) ページの遷移と b) URL によって維持されます。
ネストされたルートは、コンセント A のコン�テンツをレンダリングする必要がある場合、およびネストされたコンセント B の内部のサブコンテンツをレンダリングする必要がある場合に便利です。最も一般的な使用例は、タブです。Ionic スターターアプリのタブをロードすると、最初の ion-router-outlet で ion-tab-bar および ion-tabs コンポーネントがレンダリングされます。ion-tabs コンポーネントは、各タブの内容をレンダリングする別の 「イオンルータ出力」 をレンダリングします。
モバイルアプリケーションでネストされたルートが意味をなすユースケースはほとんどありません。疑わしい場合は、共有 URL ルート設定を使用します。ネストされたルーティングをタブ以外のコンテキストで使用すると、アプリのナビゲーションが混乱する可能性があるため、使用しないように強く注意しています。
タブの操作
タブを操作する場合、Ionic Vue はどのビューがどのタブに属しているかを知る方法を必要とします。ここでは IonTabs コンポーネントが便利ですが、この場合のルーティング設定を見てみましょう:
const routes: Array<RouteRecordRaw> = [
  {
    path: '/',
    redirect: '/tabs/tab1',
  },
  {
    path: '/tabs/',
    component: Tabs,
    children: [
      {
        path: '',
        redirect: 'tab1',
      },
      {
        path: 'tab1',
        component: () => import('@/views/Tab1.vue'),
      },
      {
        path: 'tab2',
        component: () => import('@/views/Tab2.vue'),
      },
      {
        path: 'tab3',
        component: () => import('@/views/Tab3.vue'),
      },
    ],
  },
];
ここで、 tabs パスは Tabs コンポーネントをロードします。各タブは、 children 配列内のルートオブジェクトとして提供されます。この例では、パスを tabs としていますがこれはカスタマイズできます。
まず、 Tabs コンポーネントをみていきましょう:
<template>
  <ion-page>
    <ion-tabs>
      <ion-router-outlet></ion-router-outlet>
      <ion-tab-bar slot="bottom">
        <ion-tab-button tab="tab1" href="/tabs/tab1">
          <ion-icon :icon="triangle" />
          <ion-label>Tab 1</ion-label>
        </ion-tab-button>

        <ion-tab-button tab="tab2" href="/tabs/tab2">
          <ion-icon :icon="ellipse" />
          <ion-label>Tab 2</ion-label>
        </ion-tab-button>

        <ion-tab-button tab="tab3" href="/tabs/tab3">
          <ion-icon :icon="square" />
          <ion-label>Tab 3</ion-label>
        </ion-tab-button>
      </ion-tab-bar>
    </ion-tabs>
  </ion-page>
</template>

<script setup lang="ts">
import { IonTabBar, IonTabButton, IonTabs, IonLabel, IonIcon, IonPage, IonRouterOutlet } from '@ionic/vue';
import { ellipse, square, triangle } from 'ionicons/icons';
</script>
以前に Ionic Framework を使ったことがある人なら、このことをよく知っているはずです。ion-tabs コンポーネントを作成し、 ion-tab-bar を提供します。ion-tab-bar は ion-tab-button コンポーネントを提供し、それぞれにルータの設定の対応するタブに関連付けられた tab プロパティがあります。
タブ内の子ルート
Each tab in Ionic is treated as an individual navigation stack. This means if you have three tabs in your application, each tab has its own navigation stack. Within each stack you can navigate forwards (push a view) and backwards (pop a view).
This behavior is important to note as it is different than most tab implementations that are found in other web based UI libraries. Other libraries typically manage tabs as one single history stack.
Since Ionic is focused on helping developers build mobile apps, the tabs in Ionic are designed to match native mobile tabs as closely as possible. As a result, there may be certain behaviors in Ionic's tabs that differ from tabs implementations you have seen in other UI libraries. Read on to learn more about some of these differences.
Child Routes within Tabs
When adding additional routes to tabs you should write them as sibling routes with the parent tab as the path prefix. The example below defines the /tabs/tab1/view route as a sibling of the /tabs/tab1 route. Since this new route has the tab1 prefix, it will be rendered inside of the Tabs component, and Tab 1 will still be selected in the ion-tab-bar.
const routes: Array<RouteRecordRaw> = [
  {
    path: '/',
    redirect: '/tabs/tab1',
  },
  {
    path: '/tabs/',
    component: Tabs,
    children: [
      {
        path: '',
        redirect: 'tab1',
      },
      {
        path: 'tab1',
        component: () => import('@/views/Tab1.vue'),
      },
      {
        path: 'tab1/view',
        component: () => import('@/views/Tab1View.vue'),
      },
      {
        path: 'tab2',
        component: () => import('@/views/Tab2.vue'),
      },
      {
        path: 'tab3',
        component: () => import('@/views/Tab3.vue'),
      },
    ],
  },
];
Switching Between Tabs
Since each tab is its own navigation stack, it is important to note that these navigation stacks should never interact. This means that there should never be a button in Tab 1 that routes a user to Tab 2. In other words, tabs should only be changed by the user tapping a tab button in the tab bar.
A good example of this in practice is the iOS App Store and Google Play Store mobile applications. These apps both provide tabbed interfaces, but neither one ever routes the user across tabs. For example, the "Games" tab in the iOS App Store app never directs users to the "Search" tab and vice versa.
Let's take a look at a couple common mistakes that are made with tabs.
A Settings Tab That Multiple Tabs Reference
A common practice is to create a Settings view as its own tab. This is great if developers need to present several nested settings menus. However, other tabs should never try to route to the Settings tab. As we mentioned above, the only way that the Settings tab should be activated is by a user tapping the appropriate tab button.
If you find that your tabs need to reference the Settings tab, we recommend making the Settings view a modal by using ion-modal. This is a practice found in the iOS App Store app. With this approach, any tab can present the modal without breaking the mobile tabs pattern of each tab being its own stack.
The example below shows how the iOS App Store app handles presenting an "Account" view from multiple tabs. By presenting the "Account" view in a modal, the app can work within the mobile tabs best practices to show the same view across multiple tabs.
Reusing Views Across Tabs
Another common practice is to present the same view in multiple tabs. Developers often try to do this by having the view contained in a single tab, with other tabs routing to that tab. As we mentioned above, this breaks the mobile tabs pattern and should be avoided.
Instead, we recommend having routes in each tab that reference the same component. This is a practice done in popular apps like Spotify. For example, you can access an album or podcast from the "Home", "Search", and "Your Library" tabs. When accessing the album or podcast, users stay within that tab. The app does this by creating routes per tab and sharing a common component in the codebase.
The example below shows how the Spotify app reuses the same album component to show content in multiple tabs. Notice that each screenshot shows the same album but from a different tab.
| Home Tab | Search Tab |
|---|---|
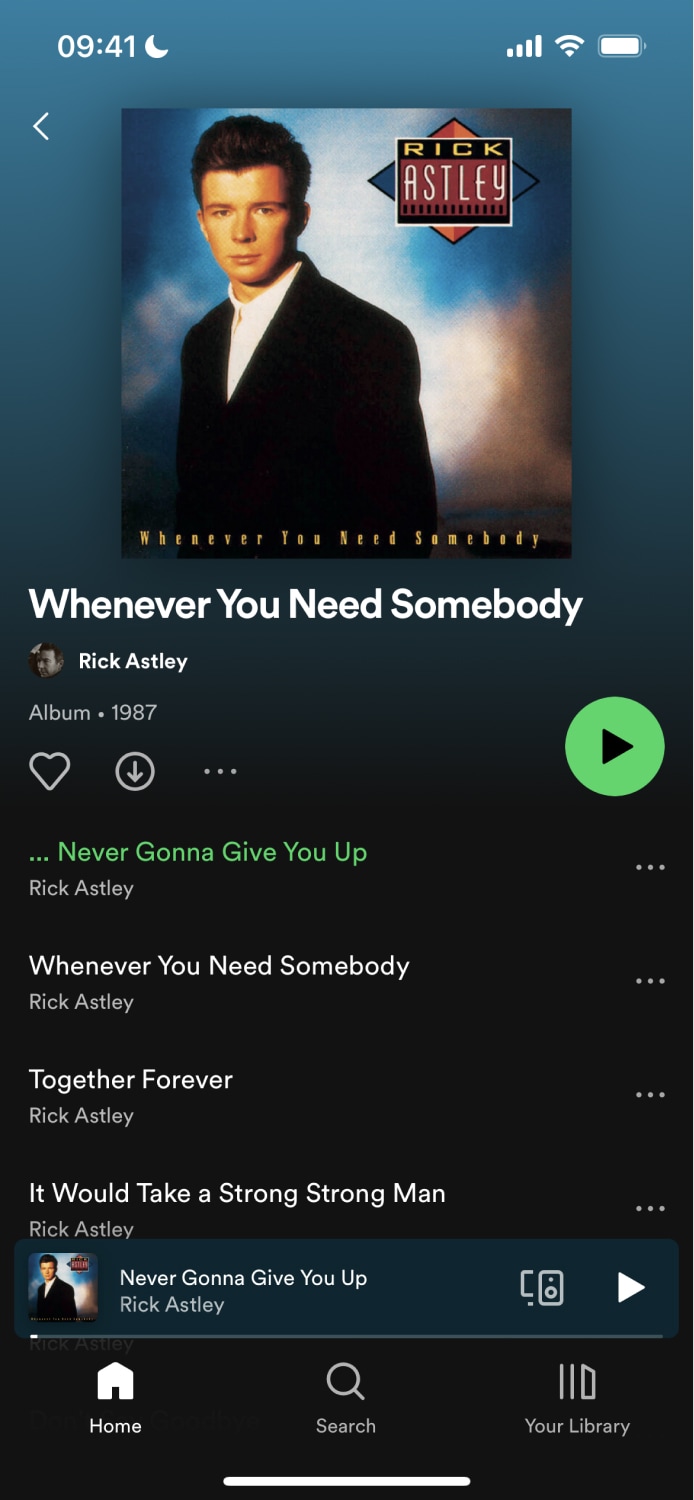 |  |
Components
IonRouterOutlet
IonRouterOutlet コンポーネントは�、ビューをレンダリングするためのコンテナを提供します。これは他の Vue アプリケーションに見られる RouterView コンポーネントに似ていますが、 IonRouterOutlet は同じアウトレット内の DOM で複数のページをレンダリングできるという点が異なります。コンポーネントが IonRouterOutlet でレンダリングされる場合、これは Ionic Framework "Page"と見なされます。ルーター・アウトレット・コンテナーは、ページ間の遷移アニメーションを制御するだけでなく、ページがいつ作成および破棄されるかを制御します。これにより、ビューを切り替えるときにビュー間の状態を維持することができます。
テンプレートで設定する際に、 IonRouterOutlet の内部には何も指定しないでください。IonRouterOutlet は子コンポーネントにネストすることができますが、通常はアプリケーション内のナビゲーションが混乱するため注意が必要です。詳細については、Shared URLs versus Nested Routes を参照してください。
IonPage
The IonPage component wraps each view in an Ionic Vue app and allows page transitions and stack navigation to work properly. Each view that is navigated to using the router must include an IonPage component.
IonPage is also required for proper styling. It provides a flex container that ensures page content, such as IonContent, is properly sized and does not overlap other UI elements like IonTabBar.
<template>
  <ion-page>
    <ion-header>
      <ion-toolbar>
        <ion-title>Home</ion-title>
      </ion-toolbar>
    </ion-header>
    <ion-content class="ion-padding">Hello World</ion-content>
  </ion-page>
</template>

<script setup lang="ts">
import { IonContent, IonHeader, IonPage, IonTitle, IonToolbar } from '@ionic/vue';
</script>
Components presented via IonModal or IonPopover do not typically need an IonPage component unless you need a wrapper element. In that case, we recommend using IonPage so that the component dimensions are still computed properly.
Functions
useIonRouter
▸ useIonRouter(): UseIonRouterResult
Returns the Ionic router instance, containing API methods for navigating, customizing page transitions and routing context for native features. This function can be used in combination with the useRouter function from Vue.
For example usages, please refer to our Utility Functions.
URL パラメーター
元のルーティング例を拡張して、URL パラメータの使用方法を示します:
const routes: Array<RouteRecordRaw> = [
  {
    path: '/',
    redirect: '/home',
  },
  {
    path: '/home',
    name: 'Home',
    component: HomePage,
  },
  {
    path: '/detail/:id',
    name: 'Detail',
    component: DetailPage,
  },
];
ここで、 detail パス文字列の最後に :id を追加したことに注意してください。URL パラメータは、ルートパスの動的な部分です。ユーザーが /details/1 などの URL に移動すると、 "1" が "id" という名前のパラメータに保存され、ルートのレンダリング時にコンポーネントでアクセスできるようになります。
コンポーネントでの使用方法を見てみましょう。
<template>
  <ion-page>
    <ion-header>
      <ion-toolbar>
        <ion-title>Details</ion-title>
      </ion-toolbar>
    </ion-header>

    <ion-content> Detail ID: {{ id }} </ion-content>
  </ion-page>
</template>

<script setup lang="ts">
import { IonContent, IonHeader, IonPage, IonTitle, IonToolbar } from '@ionic/vue';
import { useRoute } from 'vue-router';

const route = useRoute();
const { id } = route.params;
</script>
Our route variable contains an instance of the current route. It also contains any parameters we have passed in. We can obtain the id parameter from here and display it on the screen.
Router History
Vue Router ships with a configurable history mode. Let's look at the different options and why you might want to use each one.
-
createWebHistory: This option creates an HTML5 history. It leverages the History API to achieve URL navigation without a page reload. This is the most common history mode for single page applications. When in doubt, usecreateWebHistory. -
createWebHashHistory: This option adds a hash (#) to your URL. This is useful for web applications with no host or when you do not have full control over the server routes. Search engines sometimes ignore hash fragments, so you should usecreateWebHistoryinstead if SEO is important for your application. -
createMemoryHistory: This option creates an in-memory based history. This is mainly used to handle server-side rendering (SSR).
More Information
For more info on routing in Vue using Vue Router, check out their docs at http://router.vuejs.org/.