Angular ナビゲーション
このガイドでは、Ionic と Angular を使用して構築されたアプリでのルーティングのしくみについて説明します。
Angular Router は、Angular アプリケーションで最も重要なライブラリの 1 つです。これがなければ、アプリはシングルビュー/シングルコンテキストアプリになるか、ブラウザのリロード時にナビゲーションのステートを維持できなくなります。Angular Router を使用すると、リンク可能でリッチなアニメーションを持つリッチなアプリを作成できます(もちろん、Ionic と組み合わせると!)。Angular Router の基本と、それを Ionic アプリケーション用に設定する方法を見てみましょう。
シンプルな Route
ほとんどのアプリでは、some sort of route を持つことがしばしば必要になります。最も基本的な設定はこのようになります:
import { RouterModule } from '@angular/router';

@NgModule({
  imports: [
  ...
  RouterModule.forRoot([
    { path: '', component: LoginComponent },
    { path: 'detail', component: DetailComponent },
  ])
  ],
})
URL path と Component の組み合わせを確認する最も簡単な方法は、ここをみるすることです。アプリがロードされると、ルーターはユーザーがロードしようとしている URL を読むことで動作を開始します。私たちのサンプルでは、Route は '' を参照します。これは本質的に私たちのインデックスルートとなります。そうすると、一致するエントリを探し出して、 LoginComponent がロードされます。かなり簡単です。この処理は path が一致するまで、設定されているすべての Route のエントリを参照します。しかし、初期ロードと異なるパスをロードしたい場合はどうなりますか?
リダイレクトの処理
そういう場合には、ルーターリダイレクトを使用できます。リダイレクトは通常のルートオブジェクトと同じように書くことができますが、いくつかの異なるキーが含まれます。
[
  { path: '', redirectTo: 'login', pathMatch: 'full' },
  { path: 'login', component: LoginComponent },
  { path: 'detail', component: DetailComponent },
];
このリダイレクトでは、アプリのインデックス('')を探しはじめると、login にリダイレクトします。最後の pathMatch キーは、ルータにパスの検索方法を指示するために必要です。
full を使用すると、たとえ最後まで /route1/route2/route3 と一致する path がなかったとしても、フルパスを比較する必要があることをルータに伝えることができます。つまり、次のようになります。
{ path: '/route1/route2/route3', redirectTo: 'login', pathMatch: 'full' },
{ path: 'login', component: LoginComponent },
このように書くと /route1/route2/route3 をロードすると、リダイレクトを行います。けれど仮に /route1/route2/route4 であれば、すべての path が一致しないのでリダイレクトを行いません。
あるいは、こういう書き方もできます:
{ path: '/route1/route2', redirectTo: 'login', pathMatch: 'prefix' },
{ path: 'login', component: LoginComponent },
/route1/route2/route3 と /route1/route2/route4 の両方を読み込んだとおき, どちらの場合もリダイレクトします。 pathMatch: 'prefix' によって、一部でも一致したら該当するからです。
routes へのナビゲーション
routes について説明してきましたが、それではどのようにしてそのルートにナビゲーションしたらいいのでしょうか。これには、 routerLink directive を利用します。先ほどの簡単な router 設定でこれを確認してみましょう:
RouterModule.forRoot([
  { path: '', component: LoginComponent },
  { path: 'detail', component: DetailComponent },
]);
わたしたちは、次の HTML を利用することで、LoginComponent から detail route に遷移することができます。
<ion-header>
  <ion-toolbar>
    <ion-title>Login</ion-title>
  </ion-toolbar>
</ion-header>

<ion-content class="ion-padding">
  <ion-button [routerLink]="['/detail']">Go to detail</ion-button>
</ion-content>
ここで重要なのはion-button と routerLink directive です。RouterLink は典型的な href と同様の考えで動作しますが、URL を文字列として構築する代わりに配列として構築することができ、それによってより複雑なパスを書くこともできます。
Router API を使用して、プログラムで遷移することもできます。
import { Component } from '@angular/core';
import { Router } from '@angular/router';

@Component({
  ...
})
export class LoginComponent {

  constructor(private router: Router){}

  navigate(){
    this.router.navigate(['/detail'])
  }
}
どちらのオプションも同様のナビゲーションメカニズムを提供し、異なるユースケースで利用することができます。
LocationStrategy.historyGo を使ったナビゲーション
Angular Router には LocationStrategy.historyGo メソッドがあり、アプリケーションの履歴を進んだり戻ったりすることができます。例を見てみましょう。
次のようなアプリケーションの履歴があるとします:
/ページA --> /ページB --> /ページC。
もし /pageC で LocationStrategy.historyGo(-2) を呼び出すと、 /pageA に戻る。その後、 LocationStrategy.historyGo(2) を呼び出すと、 /pageC に戻る。
LocationStrategy.historyGo() の主な特徴は、アプリケーションの履歴が線形であることを想定していることです。つまり、LocationStrategy.historyGo() は非線形のルーティングを使用するアプリケーションでは使用すべきではありません。詳しくは リニアルーティング対非リニアルーティング を参照してください。
Lazy loading routes
現在のルート設定では、すべての Component が、ルートとなる app.module と同じ chunk に含まれているので理想的ではありません。代わりに、ルータにはコンポーネントを独自の chunk に分離できるように設定されています。
import { RouterModule } from '@angular/router';

@NgModule({
  imports: [
  ...
  RouterModule.forRoot([
    { path: '', redirectTo: 'login', pathMatch: 'full' },
    { path: 'login', loadChildren: () => import('./login/login.module').then(m => m.LoginModule) },
    { path: 'detail', loadChildren: () => import('./detail/detail.module').then(m => m.DetailModule) }
  ])
  ],
})
loadChildren プロパティはコンポーネントの代わりにネイティブインポートを直接仕様してモジュールを参照する方法です。ただしこれを行うには、コンポーネントごとにモジュールを作成する必要がありま�す。
...
import { RouterModule } from '@angular/router';
import { LoginComponent } from './login.component';

@NgModule({
  imports: [
  ...
  RouterModule.forChild([
    { path: '', component: LoginComponent },
  ])
  ],
})
一部のコードを省略して紹介しています
ここでは、RouterModule のインポートとともに、典型的な Angular Module の設定がありますが、RouterModule では forChild によってコンポーネントを使用することを宣言しています。この設定では、ビルドを実行するときに、App Component(Root)、 login Component 、および detail Component において別々のチャンクを作成します。
Standalone Components
Standalone components allow developers to lazy load a component on a route without having to declare the component to an Angular module.
Developers can use the existing syntax for standalone component routing from Angular:
@NgModule({
  imports: [
    RouterModule.forRoot([
      {
        path: 'standalone-route',
        loadComponent: () => import('./path/to/my-component.component').then((c) => c.MyComponent),
      },
    ]),
  ],
})
export class AppRoutingModule {}
If you are using routerLink, routerDirection, or routerAction be sure to also import the IonRouterLink directive for Ionic components or the IonRouterLinkWithHref directive for <a> elements. An example of this is available in the Ionic Angular Build Options docs.
To get started with standalone components visit Angular's official docs.
Live Example
If you would prefer to get hands on with the concepts and code described above, please checkout our live example of the topics above on StackBlitz.
Linear Routing versus Non-Linear Routing
Linear Routing
If you have built a web app that uses routing, you likely have used linear routing before. Linear routing means that you can move forward or backward through the application history by pushing and popping pages.
The following is an example of linear routing in a mobile app:
The application history in this example has the following path:
Accessibility --> VoiceOver --> Speech
When we press the back button, we follow that same routing path except in reverse. Linear routing is helpful in that it allows for simple and predictable routing behaviors. It also means we can use router Angular Router APIs such as LocationStrategy.historyGo().
The downside of linear routing is that it does not allow for complex user experiences such as tab views. This is where non-linear routing comes into play.
Non-Linear Routing
Non-linear routing is a concept that may be new to many web developers learning to build mobile apps with Ionic.
Non-linear routing means that the view that the user should go back to is not necessarily the previous view that was displayed on the screen.
The following is an example of non-linear routing:
In the example above, we start on the Originals tab. Tapping a card brings us to the Ted Lasso view within the Originals tab.
From here, we switch to the Search tab. Then, we tap the Originals tab again and are brought back to the Ted Lasso view. At this point, we have started using non-linear routing.
Why is this non-linear routing? The previous view we were on was the Search view. However, pressing the back button on the Ted Lasso view should bring us back to the root Originals view. This happens because each tab in a mobile app is treated as its own stack. The Working with Tabs sections goes over this in more detail.
If tapping the back button simply called LocationStrategy.historyGo(-1) from the Ted Lasso view, we would be brought back to the Search view which is not correct.
Non-linear routing allows for sophisticated user flows that linear routing cannot handle. However, certain linear routing APIs such as LocationStrategy.historyGo() cannot be used in this non-linear environment. This means that LocationStrategy.historyGo() should not be used when using tabs or nested outlets.
Which one should I choose?
We recommend keeping your application as simple as possible until you need to add non-linear routing. Non-linear routing is very powerful, but it also adds a considerable amount of complexity to mobile applications.
The two most common uses of non-linear routing is with tabs and nested ion-router-outlets. We recommend only using non-linear routing if your application meets the tabs or nested router outlet use cases.
For more on tabs, please see Working with Tabs.
For more on nested router outlets, please see Nested Routes.
Shared URLs versus Nested Routes
A common point of confusion when setting up routing is deciding between shared URLs or nested routes. This part of the guide will explain both and help you decide which one to use.
Shared URLs
Shared URLs is a route configuration where routes have pieces of the URL in common. The following is an example of a shared URL configuration:
const routes: Routes = [
  {
    path: 'dashboard',
    component: DashboardMainPage,
  },
  {
    path: 'dashboard/stats',
    component: DashboardStatsPage,
  },
];
The above routes are considered "shared" because they reuse the dashboard piece of the URL.
Nested Routes
Nested Routes is a route configuration where routes are listed as children of other routes. The following is an example of a nested route configuration:
const routes: Routes = [
  {
    path: 'dashboard',
    component: DashboardRouterOutlet,
    children: [
      {
        path: '',
        component: DashboardMainPage,
      },
      {
        path: 'stats',
        component: DashboardStatsPage,
      },
    ],
  },
];
The above routes are nested because they are in the children array of the parent route. Notice that the parent route renders the DashboardRouterOutlet component. When you nest routes, you need to render another instance of ion-router-outlet.
Which one should I choose?
Shared URLs are great when you want to transition from page A to page B while preserving the relationship between the two pages in the URL. In our previous example, a button on the /dashboard page could transition to the /dashboard/stats page. The relationship between the two pages is preserved because of a) the page transition and b) the url.
Nested routes should be used when you want to render content in outlet A while also rendering sub-content inside of a nested outlet B. The most common use case you will run into is tabs. When you load up a tabs Ionic starter application, you will see ion-tab-bar and ion-tabs components rendered in the first ion-router-outlet. The ion-tabs component renders another ion-router-outlet which is responsible for rendering the contents of each tab.
There are very few use cases in which nested routes make sense in mobile applications. When in doubt, use the shared URL route configuration. We strongly caution against using nested routing in contexts other than tabs as it can quickly make navigating your app confusing.
Working with Tabs
タブを使用すると、Angular Router にどのコンポーネントをロードする必要があるかを知るためのメカニズムを Ionic が提供しますが、タブコンポーネントでは複雑な作業が行われます。簡単な例を見てみましょう。
const routes: Routes = [
  {
    path: 'tabs',
    component: TabsPage,
    children: [
      {
        path: 'tab1',
        children: [
          {
            path: '',
            loadChildren: () => import('../tab1/tab1.module').then((m) => m.Tab1PageModule),
          },
        ],
      },
      {
        path: '',
        redirectTo: '/tabs/tab1',
        pathMatch: 'full',
      },
    ],
  },
  {
    path: '',
    redirectTo: '/tabs/tab1',
    pathMatch: 'full',
  },
];
ここでは、 tabs パスを読み込んでいます。この例では、path を tabs としていますが、これは変更可能です。あなたのアプリに合った名前にすることができます。このルートオブジェクトでは、子ルートも定義することができます。この例では、トップレベルの子ルート「tab1」が「outlet」として機能し、さらに子ルートをロードすることができ��ます。この例では、1 つの子ルートがあり、新しいコンポーネントをロードするだけです。Tabs のマークアップは、次のとおりです:
<ion-tabs>
  <ion-tab-bar slot="bottom">
    <ion-tab-button tab="tab1">
      <ion-icon name="flash"></ion-icon>
      <ion-label>Tab One</ion-label>
    </ion-tab-button>
  </ion-tab-bar>
</ion-tabs>
Ionic を使ってアプリを作成したことがあれば、このマークアップはおなじみのはずです。ion-tabs コンポーネントを作成し、ion-tab-bar を提供します。ion-tab-bar は、 tabと一緒にion-tab-buttonを提供します。最新の @ionic/angular はもはや <ion-tab> を必要とせず、開発者がタブバーを完全にカスタマイズできるようになり、すべての設定は Router の設定によって行えるようになりました。
How Tabs in Ionic Work
Each tab in Ionic is treated as an individual navigation stack. This means if you have three tabs in your application, each tab has its own navigation stack. Within each stack you can navigate forwards (push a view) and backwards (pop a view).
This behavior is important to note as it is different than most tab implementations that are found in other web based UI libraries. Other libraries typically manage tabs as one single history stack.
Since Ionic is focused on helping developers build mobile apps, the tabs in Ionic are designed to match native mobile tabs as closely as possible. As a result, there may be certain behaviors in Ionic's tabs that differ from tabs implementations you have seen in other UI libraries. Read on to learn more about some of these differences.
Child Routes within Tabs
When adding additional routes to tabs you should write them as sibling routes with the parent tab as the path prefix. The example below defines the /tabs/tab1/view route as a sibling of the /tabs/tab1 route. Since this new route has the tab1 prefix, it will be rendered inside of the Tabs component, and Tab 1 will still be selected in the ion-tab-bar.
const routes: Routes = [
  {
    path: 'tabs',
    component: TabsPage,
    children: [
      {
        path: 'tab1',
        children: [
          {
            path: '',
            loadChildren: () => import('../tab1/tab1.module').then((m) => m.Tab1PageModule),
          },
        ],
      },
      {
        path: 'tab1/view',
        children: [
          {
            path: '',
            loadChildren: () => import('../tab1/tab1view.module').then((m) => m.Tab1ViewPageModule),
          },
        ],
      },
      {
        path: 'tab2',
        children: [
          {
            path: '',
            loadChildren: () => import('../tab2/tab2.module').then((m) => m.Tab2PageModule),
          },
        ],
      },
      {
        path: 'tab3',
        children: [
          {
            path: '',
            loadChildren: () => import('../tab3/tab3.module').then((m) => m.Tab3PageModule),
          },
        ],
      },
    ],
  },
  {
    path: '',
    redirectTo: '/tabs/tab1',
    pathMatch: 'full',
  },
];
Switching Between Tabs
Since each tab is its own navigation stack, it is important to note that these navigation stacks should never interact. This means that there should never be a button in Tab 1 that routes a user to Tab 2. In other words, tabs should only be changed by the user tapping a tab button in the tab bar.
A good example of this in practice is the iOS App Store and Google Play Store mobile applications. These apps both provide tabbed interfaces, but neither one ever routes the user across tabs. For example, the "Games" tab in the iOS App Store app never directs users to the "Search" tab and vice versa.
Let's take a look at a couple common mistakes that are made with tabs.
A Settings Tab That Multiple Tabs Reference
A common practice is to create a Settings view as its own tab. This is great if developers need to present several nested settings menus. However, other tabs should never try to route to the Settings tab. As we mentioned above, the only way that the Settings tab should be activated is by a user tapping the appropriate tab button.
If you find that your tabs need to reference the Settings tab, we recommend making the Settings view a modal by using ion-modal. This is a practice found in the iOS App Store app. With this approach, any tab can present the modal without breaking the mobile tabs pattern of each tab being its own stack.
The example below shows how the iOS App Store app handles presenting an "Account" view from multiple tabs. By presenting the "Account" view in a modal, the app can work within the mobile tabs best practices to show the same view across multiple tabs.
Reusing Views Across Tabs
Another common practice is to present the same view in multiple tabs. Developers often try to do this by having the view contained in a single tab, with other tabs routing to that tab. As we mentioned above, this breaks the mobile tabs pattern and should be avoided.
Instead, we recommend having routes in each tab that reference the same component. This is a practice done in popular apps like Spotify. For example, you can access an album or podcast from the "Home", "Search", and "Your Library" tabs. When accessing the album or podcast, users stay within that tab. The app does this by creating routes per tab and sharing a common component in the codebase.
The example below shows how the Spotify app reuses the same album component to show content in multiple tabs. Notice that each screenshot shows the same album but from a different tab.
| Home Tab | Search Tab |
|---|---|
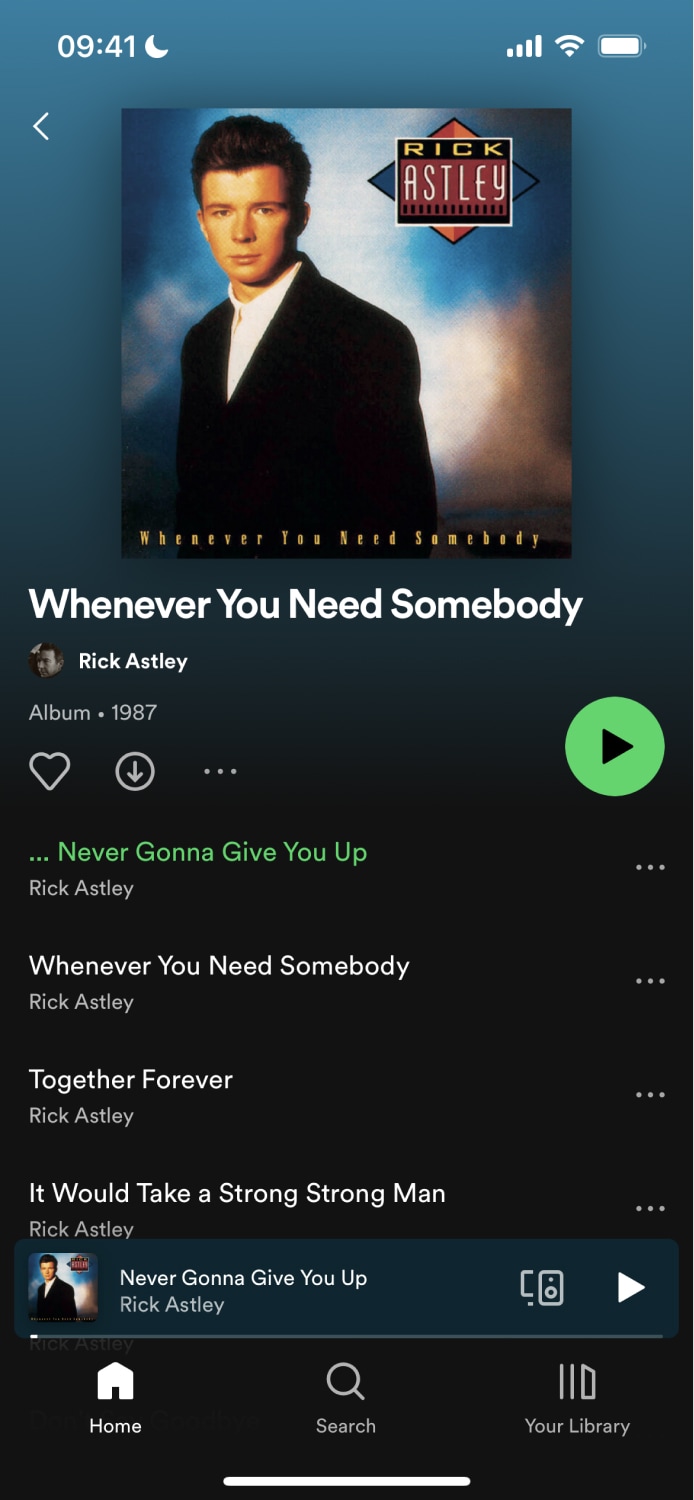 |  |